
25 posts tagged with "Flutter"

View All Tags

Lập trình Flutter – Con đường ngắn nhất để trở thành mobile developer lương cao 2025

· 3 min read

Tại sao Flutter đang "hot" trong năm 2025?

Flutter đang trở thành framework phát triển mobile được ưa chuộng nhất hiện nay, với những lý do sau:

  1. Cross-platform hiệu quả: Một codebase có thể chạy trên cả iOS và Android
  2. Hiệu năng cao: Flutter biên dịch trực tiếp sang native code
  3. UI đẹp và mượt: Sử dụng Skia engine cho animation mượt mà
  4. Hot Reload: Phát triển nhanh với khả năng cập nhật UI ngay lập tức
  5. Cộng đồng lớn: Hơn 2 triệu developer đang sử dụng Flutter

Cầu tuyển dụng Flutter Developer đang tăng mạnh

Theo thống kê mới nhất:

  • Tăng trưởng việc làm: 35% mỗi năm
  • Mức lương trung bình: $80,000 - $120,000/năm
  • Các công ty lớn đang sử dụng: Google, BMW, Alibaba, Tencent
  • Dự báo 2025: Cần thêm 500,000 Flutter developers

Thời gian học Flutter ngắn hơn các công nghệ khác

So sánh thời gian học:

Công nghệThời gian học cơ bảnThời gian thành thạo
Native iOS6-8 tháng1-2 năm
Native Android6-8 tháng1-2 năm
Flutter3-4 tháng8-12 tháng

Lý do Flutter dễ học hơn:

  1. Dart dễ học: Cú pháp tương tự Java/JavaScript
  2. Tài liệu phong phú: Google cung cấp documentation chi tiết
  3. Widget-based: Học một lần, dùng được nhiều nơi
  4. Cộng đồng hỗ trợ: Nhiều tutorial và ví dụ thực tế

Dễ xin việc với Flutter

1. Nhu cầu cao, cung thấp

  • Các công ty đang chuyển sang Flutter để tiết kiệm chi phí
  • Số lượng Flutter developer chưa đáp ứng đủ nhu cầu
  • Cơ hội thăng tiến nhanh trong ngành

2. Yêu cầu đầu vào thấp hơn

  • Không cần kinh nghiệm native development
  • Có thể bắt đầu với kiến thức lập trình cơ bản
  • Portfolio đơn giản hơn với Flutter

3. Cơ hội việc làm đa dạng

  • Làm việc tại công ty phần mềm
  • Freelance với khách hàng quốc tế
  • Startup với ý tưởng riêng
  • Remote work với công ty nước ngoài

Lộ trình học Flutter hiệu quả

1. Tháng 1-2: Kiến thức nền tảng

  • Dart programming language
  • Flutter widgets cơ bản
  • State management
  • Navigation

2. Tháng 3-4: Kiến thức nâng cao

  • API integration
  • Local storage
  • Firebase
  • Testing

3. Tháng 5-6: Dự án thực tế

  • Clone các ứng dụng phổ biến
  • Xây dựng portfolio
  • Tham gia open source

Tips để thành công với Flutter

  1. Học có hệ thống: Theo lộ trình rõ ràng
  2. Thực hành nhiều: Code mỗi ngày
  3. Tham gia cộng đồng: Flutter Vietnam, Stack Overflow
  4. Cập nhật xu hướng: Theo dõi Flutter Dev
  5. Xây dựng network: Tham gia meetup, conference

Kết luận

Flutter đang mở ra cơ hội lớn cho các developer muốn tham gia vào lĩnh vực mobile development. Với thời gian học ngắn, cầu tuyển dụng cao và mức lương hấp dẫn, Flutter là lựa chọn lý tưởng cho những ai muốn thay đổi sự nghiệp hoặc bắt đầu con đường lập trình mobile.

Tài liệu tham khảo

  1. Flutter Official Documentation
  2. Flutter Career Guide 2025
  3. Flutter Developer Survey 2024

Liên hệ

Nếu bạn cần tư vấn về lộ trình học Flutter, hãy liên hệ:

Hướng Dẫn Build APK Từ Flutter: Từng Bước Chi Tiết

· 4 min read

Hướng Dẫn Build APK Flutter

Giới thiệu

Build APK là bước quan trọng trong quá trình phát triển ứng dụng Flutter, cho phép bạn tạo ra file cài đặt để phân phối ứng dụng Android. Bài viết này sẽ hướng dẫn bạn các bước chi tiết để build APK từ dự án Flutter.

1. Chuẩn bị môi trường

1.1. Yêu cầu hệ thống

  • Flutter SDK đã được cài đặt
  • Android Studio đã được cài đặt
  • JDK (Java Development Kit) phiên bản 11 trở lên
  • Android SDK đã được cài đặt

1.2. Kiểm tra cài đặt

flutter doctor

Đảm bảo không có lỗi nào được báo cáo.

2. Cấu hình ứng dụng

2.1. Cập nhật version

Mở file pubspec.yaml và cập nhật version:

version: 1.0.0+1  # Format: version_name+version_code

2.2. Cấu hình Android

  1. Mở file android/app/build.gradle:
android {
defaultConfig {
applicationId "com.example.myapp"
minSdkVersion 21
targetSdkVersion 33
versionCode 1
versionName "1.0.0"
}
}
  1. Cấu hình signing key trong android/app/build.gradle:
android {
signingConfigs {
release {
storeFile file("your-keystore.jks")
storePassword "your-store-password"
keyAlias "your-key-alias"
keyPassword "your-key-password"
}
}
buildTypes {
release {
signingConfig signingConfigs.release
}
}
}

3. Tạo keystore

3.1. Tạo keystore mới

keytool -genkey -v -keystore ~/upload-keystore.jks -keyalg RSA -keysize 2048 -validity 10000 -alias upload

3.2. Di chuyển keystore

  1. Di chuyển file keystore vào thư mục android/app
  2. Tạo file android/key.properties:
storePassword=<password from previous step>
keyPassword=<password from previous step>
keyAlias=upload
storeFile=<location of the keystore file>

4. Build APK

4.1. Build APK Debug

flutter build apk --debug

File APK sẽ được tạo tại: build/app/outputs/flutter-apk/app-debug.apk

4.2. Build APK Release

flutter build apk --release

File APK sẽ được tạo tại: build/app/outputs/flutter-apk/app-release.apk

4.3. Build APK Split theo ABI

flutter build apk --split-per-abi

Tạo các file APK riêng cho từng kiến trúc CPU:

  • app-armeabi-v7a-release.apk
  • app-arm64-v8a-release.apk
  • app-x86_64-release.apk

5. Tối ưu hóa kích thước APK

5.1. Sử dụng R8/ProGuard

Trong android/app/build.gradle:

android {
buildTypes {
release {
minifyEnabled true
shrinkResources true
proguardFiles getDefaultProguardFile('proguard-android.txt'), 'proguard-rules.pro'
}
}
}

5.2. Loại bỏ tài nguyên không cần thiết

flutter build apk --target-platform android-arm,android-arm64 --split-per-abi

6. Kiểm tra APK

6.1. Cài đặt APK

adb install build/app/outputs/flutter-apk/app-release.apk

6.2. Kiểm tra kích thước

ls -lh build/app/outputs/flutter-apk/

7. Xử lý lỗi thường gặp

7.1. Lỗi Gradle

  • Xóa thư mục .gradlebuild
  • Chạy flutter clean
  • Thử build lại

7.2. Lỗi Keystore

  • Kiểm tra đường dẫn keystore
  • Xác nhận mật khẩu
  • Kiểm tra quyền truy cập file

7.3. Lỗi Memory

  • Tăng memory cho Gradle trong gradle.properties:
org.gradle.jvmargs=-Xmx4096M

8. Best Practices

  1. Version Control

    • Không commit keystore và mật khẩu
    • Sử dụng biến môi trường cho thông tin nhạy cảm
  2. Build Configuration

    • Sử dụng flavor để quản lý nhiều môi trường
    • Tối ưu hóa kích thước APK
    • Kiểm tra kỹ trước khi release
  3. Testing

    • Test APK trên nhiều thiết bị
    • Kiểm tra hiệu suất
    • Xác nhận tất cả tính năng hoạt động

Kết luận

Build APK là một quy trình quan trọng trong phát triển ứng dụng Flutter. Bằng cách làm theo các bước trên, bạn có thể tạo ra file APK chất lượng cao và sẵn sàng để phân phối.

Nếu bạn cần hỗ trợ thêm về việc build APK hoặc gặp bất kỳ vấn đề nào, đừng ngần ngại liên hệ với chúng tôi:

Liên hệ với chúng tôi: Zalo


Hướng dẫn tích hợp AI vào ứng dụng Flutter với Gemini Code Assist và Firebase AI Logic

· 5 min read

Giới thiệu

Trong thời đại AI phát triển mạnh mẽ, việc tích hợp AI vào ứng dụng di động đang trở thành xu hướng tất yếu. Bài viết này sẽ hướng dẫn bạn cách tích hợp Google Gemini và Firebase AI Logic vào ứng dụng Flutter một cách hiệu quả.

1. Cài đặt và Cấu hình

1.1. Thêm dependencies

# pubspec.yaml
dependencies:
flutter:
sdk: flutter
google_generative_ai: ^0.2.0
firebase_core: ^2.24.2
firebase_ml_kit: ^0.16.3
google_mlkit_text_recognition: ^0.11.0

1.2. Cấu hình Firebase

  1. Tạo project trên Firebase Console
  2. Tải file google-services.json cho Android
  3. Tải file GoogleService-Info.plist cho iOS

2. Tích hợp Gemini AI

2.1. Khởi tạo Gemini Client

import 'package:google_generative_ai/google_generative_ai.dart';

class GeminiService {
final GenerativeModel _model;

GeminiService() {
_model = GenerativeModel(
model: 'gemini-pro',
apiKey: 'YOUR_API_KEY',
);
}

Future<String> generateResponse(String prompt) async {
try {
final content = [Content.text(prompt)];
final response = await _model.generateContent(content);
return response.text ?? 'No response generated';
} catch (e) {
print('Error generating response: $e');
return 'Error occurred while generating response';
}
}
}

2.2. Tạo UI cho Chat Interface

class ChatScreen extends StatefulWidget {

_ChatScreenState createState() => _ChatScreenState();
}

class _ChatScreenState extends State<ChatScreen> {
final TextEditingController _controller = TextEditingController();
final List<ChatMessage> _messages = [];
final GeminiService _geminiService = GeminiService();


Widget build(BuildContext context) {
return Scaffold(
appBar: AppBar(title: Text('AI Chat')),
body: Column(
children: [
Expanded(
child: ListView.builder(
itemCount: _messages.length,
itemBuilder: (context, index) => _messages[index],
),
),
Padding(
padding: const EdgeInsets.all(8.0),
child: Row(
children: [
Expanded(
child: TextField(
controller: _controller,
decoration: InputDecoration(
hintText: 'Type your message...',
border: OutlineInputBorder(),
),
),
),
IconButton(
icon: Icon(Icons.send),
onPressed: _sendMessage,
),
],
),
),
],
),
);
}

void _sendMessage() async {
if (_controller.text.isEmpty) return;

final userMessage = ChatMessage(
text: _controller.text,
isUser: true,
);

setState(() {
_messages.add(userMessage);
_controller.clear();
});

final response = await _geminiService.generateResponse(userMessage.text);

setState(() {
_messages.add(ChatMessage(
text: response,
isUser: false,
));
});
}
}

3. Tích hợp Firebase AI Logic

3.1. Cấu hình Firebase ML Kit

import 'package:firebase_ml_kit/firebase_ml_kit.dart';

class FirebaseAIService {
final TextRecognizer _textRecognizer = FirebaseVision.instance.textRecognizer();

Future<String> recognizeText(String imagePath) async {
try {
final FirebaseVisionImage image =
FirebaseVisionImage.fromFilePath(imagePath);
final VisionText visionText =
await _textRecognizer.processImage(image);

return visionText.text;
} catch (e) {
print('Error recognizing text: $e');
return 'Error occurred while recognizing text';
}
}
}

3.2. Tạo UI cho Text Recognition

class TextRecognitionScreen extends StatefulWidget {

_TextRecognitionScreenState createState() => _TextRecognitionScreenState();
}

class _TextRecognitionScreenState extends State<TextRecognitionScreen> {
final FirebaseAIService _aiService = FirebaseAIService();
String _recognizedText = '';
bool _isProcessing = false;

Future<void> _processImage() async {
setState(() {
_isProcessing = true;
});

// Implement image picking logic here
final String imagePath = await ImagePicker().getImage();

if (imagePath != null) {
final text = await _aiService.recognizeText(imagePath);
setState(() {
_recognizedText = text;
_isProcessing = false;
});
}
}


Widget build(BuildContext context) {
return Scaffold(
appBar: AppBar(title: Text('Text Recognition')),
body: Column(
children: [
if (_isProcessing)
CircularProgressIndicator()
else
Expanded(
child: SingleChildScrollView(
padding: EdgeInsets.all(16),
child: Text(_recognizedText),
),
),
ElevatedButton(
onPressed: _processImage,
child: Text('Select Image'),
),
],
),
);
}
}

4. Best Practices và Tips

4.1. Xử lý lỗi và Retry Logic

class AIService {
Future<T> withRetry<T>(Future<T> Function() operation) async {
int maxAttempts = 3;
int attempt = 0;

while (attempt < maxAttempts) {
try {
return await operation();
} catch (e) {
attempt++;
if (attempt == maxAttempts) rethrow;
await Future.delayed(Duration(seconds: attempt * 2));
}
}
throw Exception('Max retry attempts reached');
}
}

4.2. Caching Responses

class AICache {
final Map<String, String> _cache = {};

String? getCachedResponse(String prompt) {
return _cache[prompt];
}

void cacheResponse(String prompt, String response) {
_cache[prompt] = response;
}
}

5. Performance Optimization

5.1. Lazy Loading và Pagination

class PaginatedChat extends StatefulWidget {

_PaginatedChatState createState() => _PaginatedChatState();
}

class _PaginatedChatState extends State<PaginatedChat> {
final ScrollController _scrollController = ScrollController();
final List<ChatMessage> _messages = [];
bool _isLoading = false;
int _page = 1;


void initState() {
super.initState();
_scrollController.addListener(_scrollListener);
_loadMessages();
}

void _scrollListener() {
if (_scrollController.position.pixels ==
_scrollController.position.maxScrollExtent) {
_loadMoreMessages();
}
}

Future<void> _loadMoreMessages() async {
if (_isLoading) return;

setState(() {
_isLoading = true;
});

// Implement pagination logic here
final newMessages = await _loadMessagesFromAPI(_page++);

setState(() {
_messages.addAll(newMessages);
_isLoading = false;
});
}
}

6. Testing

6.1. Unit Tests

void main() {
group('GeminiService Tests', () {
late GeminiService service;

setUp(() {
service = GeminiService();
});

test('generateResponse returns valid response', () async {
final response = await service.generateResponse('Hello');
expect(response, isNotEmpty);
});
});
}

6.2. Widget Tests

void main() {
testWidgets('Chat UI Test', (WidgetTester tester) async {
await tester.pumpWidget(MaterialApp(home: ChatScreen()));

expect(find.text('AI Chat'), findsOneWidget);
expect(find.byType(TextField), findsOneWidget);
expect(find.byIcon(Icons.send), findsOneWidget);
});
}

Kết luận

Việc tích hợp AI vào ứng dụng Flutter không chỉ giúp tăng tính năng thông minh cho ứng dụng mà còn mở ra nhiều cơ hội phát triển mới. Với Gemini và Firebase AI Logic, bạn có thể dễ dàng thêm các tính năng AI vào ứng dụng của mình.

Tài liệu tham khảo

  1. Google Gemini Documentation
  2. Firebase ML Kit Documentation
  3. Flutter AI Integration Guide

Liên hệ

Nếu bạn có thắc mắc hoặc cần hỗ trợ thêm, hãy liên hệ:

Xây Dựng Backend cho Ứng Dụng Flutter

· 9 min read

Backend đóng vai trò là "trái tim" của hầu hết các ứng dụng hiện đại, xử lý dữ liệu, logic nghiệp vụ và giao tiếp với cơ sở dữ liệu. Đối với các ứng dụng Flutter, việc lựa chọn và xây dựng kiến trúc backend phù hợp là rất quan trọng để đảm bảo hiệu suất, khả năng mở rộng và bảo mật.

Bài viết này sẽ đi sâu vào các khía cạnh chính khi xây dựng backend cho ứng dụng Flutter, từ lựa chọn công nghệ đến kiến trúc và các vấn đề cần lưu ý.

Tại sao cần Backend cho Ứng dụng Flutter?

Flutter là một framework phát triển giao diện người dùng (frontend) mạnh mẽ. Tuy nhiên, hầu hết các ứng dụng thực tế đều cần backend để:

  • Lưu trữ dữ liệu: Cơ sở dữ liệu là nơi lưu trữ thông tin người dùng, nội dung ứng dụng, v.v.
  • Xử lý logic nghiệp vụ: Các thao tác phức tạp, tính toán, xử lý đơn hàng, v.v.
  • Xác thực và phân quyền: Quản lý người dùng, đảm bảo chỉ người dùng hợp lệ mới có thể truy cập tài nguyên.
  • Tích hợp dịch vụ bên ngoài: Kết nối với các API thanh toán, dịch vụ gửi email, v.v.
  • Đồng bộ hóa dữ liệu: Giúp dữ liệu nhất quán trên nhiều thiết bị của người dùng.

Các Lựa Chọn Kiến Trúc Backend

Có nhiều cách tiếp cận để xây dựng backend cho ứng dụng Flutter, tùy thuộc vào quy mô, độ phức tạp và yêu cầu cụ thể của dự án.

Backend tùy chỉnh (Custom Backend)

Đây là lựa chọn phổ biến nhất, cho phép bạn có toàn quyền kiểm soát stack công nghệ và kiến trúc. Bạn có thể sử dụng các ngôn ngữ và framework quen thuộc như:

  • Node.js (Express, NestJS): Phổ biến cho các ứng dụng web và API tốc độ cao.
  • Python (Django, Flask): Mạnh mẽ cho các ứng dụng phức tạp và tích hợp Machine Learning.
  • Java (Spring Boot): Lựa chọn truyền thống, mạnh mẽ cho các ứng dụng doanh nghiệp.
  • Go (Gin, Echo): Hiệu suất cao, phù hợp cho các dịch vụ microservices.
  • Ruby (Ruby on Rails): Phát triển nhanh chóng.

Ưu điểm:

  • Linh hoạt cao, tùy chỉnh theo yêu cầu dự án.
  • Tối ưu hiệu suất và chi phí (nếu quản lý tốt).

Nhược điểm:

  • Tốn thời gian và công sức phát triển ban đầu.
  • Cần đội ngũ có kinh nghiệm quản lý server và database.

Backend-as-a-Service (BaaS)

BaaS cung cấp các dịch vụ backend có sẵn như xác thực, cơ sở dữ liệu, lưu trữ tệp, chức năng cloud (serverless functions), v.v. Bạn tập trung vào phát triển frontend mà không cần lo lắng về việc quản lý server. Các BaaS phổ biến cho Flutter:

  • Firebase: Nền tảng của Google, cung cấp Realtime Database, Firestore, Authentication, Cloud Functions, Storage, Hosting, v.v.
  • Supabase: Mã nguồn mở thay thế Firebase, dựa trên PostgreSQL.
  • AWS Amplify: Nền tảng của Amazon, tích hợp nhiều dịch vụ AWS.
  • Parse Server: Một framework backend mã nguồn mở.

Ưu điểm:

  • Phát triển nhanh chóng.
  • Giảm thiểu công sức quản lý server.
  • Thường có gói miễn phí hoặc chi phí ban đầu thấp.

Nhược điểm:

  • Ít linh hoạt hơn backend tùy chỉnh.
  • Khóa chặt vào nhà cung cấp (vendor lock-in).
  • Chi phí có thể tăng cao khi ứng dụng mở rộng.

Mobile Backend as a Service (MBaaS)

MBaaS là một dạng BaaS chuyên biệt cho ứng dụng di động, thường cung cấp SDK cho các nền tảng di động (bao gồm Flutter). Ví dụ: Backendless, Kinvey.

Kiến Trúc Backend Phổ Biến

Kiến trúc Monolithic

Toàn bộ logic backend được đóng gói trong một ứng dụng duy nhất. Phù hợp cho các ứng dụng nhỏ và vừa, hoặc giai đoạn phát triển ban đầu.

Ưu điểm:

  • Dễ phát triển và triển khai ban đầu.
  • Đơn giản để quản lý.

Nhược điểm:

  • Khó mở rộng theo chiều ngang.
  • Khó bảo trì khi ứng dụng lớn dần.
  • Thay đổi nhỏ cũng cần deploy lại toàn bộ ứng dụng.

Kiến trúc Microservices

Ứng dụng backend được chia thành nhiều dịch vụ nhỏ, độc lập, giao tiếp với nhau thông qua API. Phù hợp cho các ứng dụng lớn, phức tạp, cần khả năng mở rộng cao.

Ưu điểm:

  • Dễ mở rộng theo từng dịch vụ.
  • Dễ bảo trì và phát triển độc lập.
  • Công nghệ đa dạng cho từng dịch vụ.

Nhược điểm:

  • Phức tạp trong quản lý và triển khai.
  • Cần quản lý giao tiếp giữa các dịch vụ.
  • Yêu cầu DevOps mạnh mẽ.

Kiến trúc Serverless

Sử dụng các hàm (functions) chạy trên nền tảng cloud (như AWS Lambda, Google Cloud Functions, Firebase Functions) mà không cần quản lý server. Chỉ trả tiền cho thời gian code thực thi.

Ưu điểm:

  • Tiết kiệm chi phí cho các tác vụ không thường xuyên.
  • Khả năng mở rộng tự động.
  • Giảm thiểu công sức quản lý server.

Nhược điểm:

  • Thời gian khởi động (cold start) có thể ảnh hưởng hiệu suất.
  • Giới hạn thời gian chạy.
  • Khó khăn trong debug và quản lý trạng thái.

Kiến Trúc Backend Cho Ứng Dụng Flutter

Các Thành Phần Backend Cần Có

Dù lựa chọn kiến trúc nào, một backend cho ứng dụng Flutter thường bao gồm các thành phần sau:

  • API Gateway: Điểm truy cập duy nhất cho các yêu cầu từ frontend.
  • Authentication & Authorization: Quản lý đăng nhập, đăng ký và kiểm soát quyền truy cập.
  • Business Logic Layer: Chứa các quy tắc và xử lý nghiệp vụ chính.
  • Data Access Layer: Tương tác với cơ sở dữ liệu.
  • Database: Lưu trữ và quản lý dữ liệu.
  • Storage: Lưu trữ tệp (ảnh, video, tài liệu).
  • Real-time Communication: WebSocket, Server-Sent Events cho các ứng dụng cần cập nhật dữ liệu theo thời gian thực.
  • Background Jobs/Workers: Xử lý các tác vụ nặng hoặc không đồng bộ.
  • Caching: Lưu trữ tạm thời dữ liệu thường xuyên truy cập để tăng tốc độ.

Luồng Dữ Liệu Giữa Flutter và Backend

Tích Hợp Flutter với Backend

Flutter giao tiếp với backend thông qua các API. Các cách phổ biến để thực hiện việc này:

REST API

  • Sử dụng thư viện http hoặc dio để gửi các yêu cầu HTTP (GET, POST, PUT, DELETE) đến backend.
  • Dữ liệu thường được trao đổi dưới dạng JSON.
import 'package:http/http.dart' as http;
import 'dart:convert';

Future<void> fetchData() async {
final response = await http.get(Uri.parse('https://api.example.com/data'));

if (response.statusCode == 200) {
// Xử lý dữ liệu JSON
final data = jsonDecode(response.body);
print(data);
} else {
// Xử lý lỗi
print('Request failed with status: ${response.statusCode}.');
}
}

GraphQL API

  • Sử dụng thư viện như graphql_flutter.
  • Cho phép frontend yêu cầu chính xác dữ liệu cần thiết, tránh lấy thừa hoặc thiếu dữ liệu.

Real-time Communication (WebSockets, Firebase, Supabase)

  • Sử dụng thư viện web_socket_channel cho WebSocket.
  • Sử dụng SDK của Firebase hoặc Supabase để lắng nghe các thay đổi dữ liệu theo thời gian thực.
import 'package:web_socket_channel/web_socket_channel.dart';

void connectWebSocket() {
final channel = WebSocketChannel.connect(
Uri.parse('ws://api.example.com/ws'),
);

channel.stream.listen((message) {
print('Received: $message');
});

channel.sink.add('Hello!');
}

Vấn Đề Bảo Mật

Bảo mật là tối quan trọng. Cần triển khai các biện pháp bảo mật ở cả frontend (Flutter) và backend:

  • HTTPS: Luôn sử dụng HTTPS để mã hóa dữ liệu truyền qua mạng.
  • Xác thực (Authentication): Sử dụng token (như JWT), OAuth2 hoặc các giải pháp BaaS.
  • Phân quyền (Authorization): Kiểm tra quyền truy cập của người dùng trước khi cho phép thực hiện hành động.
  • Input Validation: Kiểm tra dữ liệu đầu vào từ frontend để ngăn chặn các cuộc tấn công (SQL Injection, XSS).
  • Bảo mật cơ sở dữ liệu: Mã hóa dữ liệu nhạy cảm, cấu hình quyền truy cập chặt chẽ.
  • Rate Limiting: Giới hạn số lượng yêu cầu từ một nguồn để ngăn chặn tấn công DDoS.
  • Secure Storage: Lưu trữ thông tin nhạy cảm (token, khóa API) một cách an toàn trên thiết bị.

Bảo Mật Trong Flutter Backend

Lựa Chọn Backend Phù Hợp

Việc lựa chọn backend phụ thuộc vào nhiều yếu tố:

  • Quy mô dự án: Ứng dụng nhỏ có thể dùng BaaS, ứng dụng lớn cần backend tùy chỉnh hoặc microservices.
  • Ngân sách: BaaS có thể đắt đỏ khi mở rộng, backend tùy chỉnh cần chi phí vận hành.
  • Kinh nghiệm đội ngũ: Chọn stack công nghệ mà đội ngũ của bạn quen thuộc.
  • Yêu cầu cụ thể: Cần tính năng real-time mạnh mẽ? Cần xử lý dữ liệu phức tạp?
  • Thời gian phát triển: BaaS giúp phát triển nhanh hơn.

Kết Luận

Xây dựng backend cho ứng dụng Flutter là một quá trình quan trọng đòi hỏi sự cân nhắc kỹ lưỡng về kiến trúc, công nghệ và bảo mật. Dù bạn chọn backend tùy chỉnh, BaaS hay kết hợp các phương pháp, việc hiểu rõ các thành phần và luồng dữ liệu sẽ giúp bạn xây dựng một ứng dụng Flutter mạnh mẽ, an toàn và có khả năng mở rộng.

Hãy luôn cập nhật các biện pháp bảo mật tốt nhất và liên tục tối ưu hóa hiệu suất backend để mang lại trải nghiệm tốt nhất cho người dùng.


Hướng Dẫn Thực Tập SportSpot API Platform

· 10 min read

1. 📋 Thông Tin Dự Án End User

Tên dự án: SportSpot - Nền tảng đặt sân thể thao
Công nghệ: Node.js, Express, MongoDB, React, Flutter
Môi trường: Development & Production Ready
Database: MongoDB với Mongoose ODM
Website: SportSpot


🎯 Mục Tiêu Thực Tập

1. Kiến Thức Cần Nắm Vững

  • Backend API Development với Node.js/Express
  • Database Design và quản lý MongoDB
  • Authentication & Authorization với Session
  • RESTful API design patterns
  • Error Handling và logging
  • API Documentation và testing

2. Kỹ Năng Phát Triển

  • Thiết kế database schema phù hợp
  • Xây dựng API endpoints hiệu quả
  • Implement authentication flow
  • Testing API với Postman/curl
  • Debug và troubleshoot issues
  • Code documentation và best practices

🏗️ Kiến Trúc Hệ Thống

Backend Structure

server/
├── index.ts # Entry point
├── routes.ts # API routes definition
├── mongoStorage.ts # Database operations
├── db.ts # MongoDB schema definitions
└── middleware/ # Authentication & validation

Database Schema

Users (người dùng)
├── Authentication info
├── Profile details
└── Verification status

SportCategories (danh mục thể thao)
├── Name, description
└── Icon & display info

Facilities (cơ sở thể thao)
├── Basic info (name, address, images)
├── Pricing & capacity
└── Operating hours

SportFields (sân cụ thể)
├── Field details (type, surface, size)
├── Status & availability
└── Linked to facility

PriceTables (bảng giá)
├── Time-based pricing
├── Customer type pricing
└── Weekend/weekday rates

Bookings (đặt sân)
├── Customer information
├── Selected time slots
├── Payment & pricing details
└── Status tracking

🛠️ Các API Endpoints Chính

1. Authentication APIs

POST /api/auth/register    # Đăng ký tài khoản
POST /api/auth/login # Đăng nhập
POST /api/auth/logout # Đăng xuất
GET /api/auth/me # Lấy thông tin user hiện tại

2. Facilities & Categories APIs

GET /api/categories        # Lấy danh mục thể thao
GET /api/facilities # Lấy danh sách cơ sở thể thao
GET /api/facilities/:id # Chi tiết cơ sở thể thao
GET /api/facilities/:id/pricing # Lấy bảng giá theo thời gian

3. Booking APIs

POST /api/bookings/enhanced          # Tạo booking mới (format Flutter)
GET /api/bookings/recent # Lấy lịch sử booking
GET /api/facilities/:id/bookings # Booking theo cơ sở thể thao
GET /api/fields/:id/booked-slots # Lấy slot đã đặt theo sân

4. Admin APIs

GET  /api/bookings/:id     # Chi tiết booking
PUT /api/bookings/:id # Cập nhật booking
DELETE /api/bookings/:id # Hủy booking

💻 Hướng Dẫn Development

1. Setup Môi Trường

# Clone project
git clone [repository-url]
cd sportspot

# Install dependencies
npm install

# Setup environment variables
cp .env.example .env
# Cấu hình DATABASE_URL, SESSION_SECRET, etc.

# Start development server
npm run dev

2. Database Development

// Tạo schema mới trong db.ts
const newSchema = new mongoose.Schema({
field1: { type: String, required: true },
field2: { type: Number, default: 0 },
timestamps: true
});

// Export model
export const NewModel = mongoose.model('NewModel', newSchema);

3. API Development Pattern

// 1. Định nghĩa route trong routes.ts
app.get("/api/endpoint", async (req, res) => {
try {
// Validation
const { param } = req.params;
const { query } = req.query;

// Business logic
const result = await storage.methodName(param, query);

// Response
res.json(result);
} catch (error) {
console.error("Error:", error);
res.status(500).json({ message: "Internal server error" });
}
});

// 2. Implement logic trong mongoStorage.ts
async methodName(param: string, query?: string): Promise<ResultType> {
try {
const data = await Model.find({ conditions });
return data.map(item => ({
// Transform data
}));
} catch (error) {
console.error("Database error:", error);
throw error;
}
}

🧪 Testing Guidelines

1. API Testing với Postman

// Test Enhanced Booking API
POST http://localhost:5000/api/bookings/enhanced
{
"facilityId": "6821c96b3946d6bda8bd87e8",
"selectedSlots": [
{
"fieldId": "682bb2af35339cbc051f6f5",
"timeRange": "06:30-07:30",
"price": 350000
}
],
"bookingDate": "2025-05-27",
"totalPrice": 350000,
"customerName": "Test User",
"customerEmail": "test@example.com",
"customerPhone": "0123456789"
}

2. Testing với cURL

# Login
curl -X POST http://localhost:5000/api/auth/login \
-H "Content-Type: application/json" \
-c cookies.txt \
-d '{"username": "tamtest", "password": "123456"}'

# Test API với session
curl -X GET http://localhost:5000/api/bookings/recent \
-H "Content-Type: application/json" \
-b cookies.txt

📊 Database Operations

1. CRUD Operations

// Create
const newItem = new Model(data);
await newItem.save();

// Read
const items = await Model.find(query)
.populate('relatedField')
.sort({ createdAt: -1 });

// Update
await Model.findByIdAndUpdate(id, updateData, { new: true });

// Delete
await Model.findByIdAndDelete(id);

2. Advanced Queries

// Date range query
const bookings = await Booking.find({
bookingDate: {
$gte: startDate,
$lt: endDate
}
});

// Text search
const facilities = await Facility.find({
$or: [
{ name: { $regex: searchTerm, $options: 'i' }},
{ address: { $regex: searchTerm, $options: 'i' }}
]
});

// Aggregation
const stats = await Booking.aggregate([
{ $match: { status: 'confirmed' }},
{ $group: { _id: '$facilityId', total: { $sum: '$totalPrice' }}}
]);

🔐 Authentication Flow

1. Session-based Authentication

// Login endpoint
app.post("/api/auth/login", async (req, res) => {
const { username, password } = req.body;

// Verify credentials
const user = await storage.getUserByUsername(username);
const isValid = await bcrypt.compare(password, user.password);

if (isValid) {
// Set session
req.session.user = { id: user._id, username: user.username };
res.json(userInfo);
} else {
res.status(401).json({ message: "Invalid credentials" });
}
});

// Protected route middleware
const requireAuth = (req, res, next) => {
if (!req.session.user) {
return res.status(401).json({ message: "Not authenticated" });
}
next();
};

📱 Flutter Integration

1. Enhanced Booking Format

{
"facilityId": "facility_id",
"selectedSlots": [
{
"fieldId": "field_id", // ID sân cụ thể
"timeRange": "06:30-07:30", // Khung giờ
"price": 350000 // Giá slot này
}
],
"bookingDate": "2025-05-27",
"totalPrice": 350000,
"totalDuration": 60, // Phút
"customerName": "Tên khách hàng",
"customerEmail": "email@example.com",
"customerPhone": "0123456789",
"customerType": "Khách vãng lai"
}

2. Response Format

{
"id": "booking_id",
"userId": "user_id",
"facilityId": "facility_id",
"selectedSlots": [
{
"fieldId": "field_id",
"timeRange": "06:30-07:30",
"price": 350000
}
],
"status": "pending",
"totalPrice": 350000,
"customerInfo": "...",
"createdAt": "2025-05-27T...",
"facility": {
"name": "Tên cơ sở",
"address": "Địa chỉ"
}
}

⚠️ Error Handling Best Practices

1. Error Response Format

// Standard error response
{
"message": "Human readable error message",
"code": "ERROR_CODE",
"details": "Additional error details"
}

// Validation error response
{
"message": "Validation failed",
"errors": [
{
"field": "fieldName",
"message": "Field specific error"
}
]
}

2. Error Handling Pattern

try {
// Business logic
const result = await operationThatMightFail();
res.json(result);
} catch (error) {
// Log error for debugging
console.error("Operation failed:", error);

// Return appropriate error response
if (error.name === 'ValidationError') {
res.status(400).json({ message: "Invalid input data" });
} else if (error.name === 'CastError') {
res.status(400).json({ message: "Invalid ID format" });
} else {
res.status(500).json({ message: "Internal server error" });
}
}

📈 Performance Optimization

1. Database Indexing

// Tạo index cho truy vấn thường xuyên
facilitySchema.index({ name: 'text', address: 'text' });
bookingSchema.index({ facilityId: 1, bookingDate: 1 });
userSchema.index({ username: 1 }, { unique: true });

2. Query Optimization

// Sử dụng lean() cho read-only queries
const facilities = await Facility.find(query).lean();

// Limit fields với select()
const users = await User.find().select('name email phone');

// Pagination
const page = parseInt(req.query.page) || 1;
const limit = parseInt(req.query.limit) || 10;
const skip = (page - 1) * limit;

const results = await Model.find(query)
.skip(skip)
.limit(limit);

📝 Documentation Standards

1. API Documentation Format

/**
* GET /api/facilities/:id/bookings
*
* Lấy danh sách booking của một cơ sở thể thao
*
* @param {string} id - ID của cơ sở thể thao
* @query {string} date - Ngày cần lọc (YYYY-MM-DD) - optional
*
* @returns {Array} Danh sách booking
* @example
* // Request
* GET /api/facilities/123/bookings?date=2025-05-27
*
* // Response
* [
* {
* "id": "booking_id",
* "customerName": "Tên khách",
* "selectedSlots": [...],
* "totalPrice": 350000
* }
* ]
*/

2. Code Comments

// Xử lý logic đặt sân với multiple time slots
const processBookingSlots = (selectedSlots) => {
// Validate từng slot
selectedSlots.forEach(slot => {
if (!slot.fieldId || !slot.timeRange) {
throw new Error('Missing required slot data');
}
});

// Tính tổng thời gian và giá
const totalDuration = calculateTotalDuration(selectedSlots);
const totalPrice = selectedSlots.reduce((sum, slot) => sum + slot.price, 0);

return { totalDuration, totalPrice };
};

🎯 Assignments cho Thực Tập Sinh

Week 1: Setup & Understanding

  • Setup development environment
  • Understand project structure
  • Run và test existing APIs
  • Study database schema
  • Create first simple API endpoint

Week 2: CRUD Operations

  • Implement facility management APIs
  • Add field validation
  • Create search functionality
  • Practice error handling
  • Write API documentation

Week 3: Advanced Features

  • Implement booking system
  • Add authentication middleware
  • Create reporting APIs
  • Optimize database queries
  • Add logging system

Week 4: Integration & Testing

  • Test with Flutter app
  • Fix integration issues
  • Performance optimization
  • Deploy to staging
  • Final documentation

📚 Tài Liệu Tham Khảo

1. Technologies

2. Best Practices

3. Testing Tools


🔧 Troubleshooting Common Issues

1. Database Connection Issues

// Check MongoDB connection
if (mongoose.connection.readyState !== 1) {
console.error('MongoDB not connected');
// Implement reconnection logic
}

2. Session Problems

// Debug session issues
app.use((req, res, next) => {
console.log('Session:', req.session);
console.log('User:', req.session?.user);
next();
});

3. CORS Issues

// Enable CORS for development
app.use(cors({
origin: 'http://localhost:3000',
credentials: true
}));

🎖️ Đánh Giá & Tiến Độ

Tiêu Chí Đánh Giá

  1. Code Quality (30%)

    • Clean, readable code
    • Proper error handling
    • Following best practices
  2. API Functionality (25%)

    • Correct implementation
    • Proper HTTP status codes
    • Data validation
  3. Database Design (20%)

    • Efficient queries
    • Proper relationships
    • Data integrity
  4. Documentation (15%)

    • API documentation
    • Code comments
    • User guides
  5. Problem Solving (10%)

    • Debugging skills
    • Independent learning
    • Creative solutions

Milestone Checkpoints

  • Week 1: Environment setup + Basic understanding
  • Week 2: First working API endpoints
  • Week 3: Complete booking system
  • Week 4: Integration testing + Deployment

Liên hệ hỗ trợ:

Happy Coding! 🚀

2. 📋 Thông Tin Dự Án Admin

Thông tin admin: thanhdt9279@gmail.com / 123456

📊 Tổng thể nhân sự bao gồm:

  1. Team DB và Backend:

    • 1 Database (DB)
    • 1 API
      Do Thành và Vũ phụ trách backend (DB + API)
  2. 🖥️ Giao diện và chức năng Web Admin:
    Trang tổng quan (Dashboard + trạng thái sân)

    • 1 UI Web: Đã có
    • 1 FE Web: Do Chiến đảm nhiệm
  3. 📱 Giao diện và chức năng App Admin:

    • 1 UI App: Đạt
    • 1 FE App: Chưa

Flutter hỗ trợ iOS và Android không?

· 5 min read

Flutter có hỗ trợ phát triển ứng dụng trên cả hai nền tảng iOS và Android không?

Flutter Cross-Platform Development

Giới thiệu

Flutter là một framework phát triển ứng dụng di động mã nguồn mở được phát triển bởi Google. Ra mắt lần đầu tiên vào năm 2017, Flutter đã nhanh chóng trở thành một trong những công cụ phổ biến nhất để phát triển ứng dụng đa nền tảng.

Flutter và tính năng đa nền tảng

Để trả lời câu hỏi chính: Có, Flutter hỗ trợ đầy đủ việc phát triển ứng dụng trên cả iOS và Android từ một codebase duy nhất. Đây chính là một trong những điểm mạnh chính và cũng là lý do khiến Flutter ngày càng được ưa chuộng trong cộng đồng phát triển ứng dụng di động.

Cách Flutter hoạt động trên các nền tảng khác nhau

Flutter sử dụng cách tiếp cận độc đáo để đạt được khả năng đa nền tảng:

  1. Kiến trúc độc lập với nền tảng: Flutter không sử dụng các thành phần UI gốc của iOS hay Android. Thay vào đó, nó triển khai các widget và hệ thống render của riêng mình.

  2. Skia Graphics Engine: Flutter sử dụng engine đồ họa Skia (cũng được sử dụng bởi Chrome và Android) để vẽ mọi pixel lên màn hình, đảm bảo giao diện người dùng giống nhau trên mọi thiết bị.

  3. Dart Platform: Flutter sử dụng ngôn ngữ lập trình Dart - ngôn ngữ được tối ưu hóa cho việc phát triển ứng dụng di động và web.

Lợi ích của Flutter cho phát triển iOS và Android

1. Mã nguồn duy nhất

Với Flutter, bạn chỉ cần viết code một lần và có thể triển khai trên cả iOS và Android, giúp:

  • Giảm thời gian phát triển đến 50%
  • Dễ dàng bảo trì và cập nhật
  • Đảm bảo tính nhất quán giữa các nền tảng

2. Hiệu suất cao

Ứng dụng Flutter được biên dịch thành mã máy gốc (native code), cho phép:

  • Hiệu suất gần tương đương với ứng dụng native
  • Khởi động nhanh
  • Hoạt động mượt mà với tốc độ 60fps

3. Hot Reload

Tính năng Hot Reload của Flutter cho phép nhà phát triển thấy thay đổi ngay lập tức mà không cần khởi động lại ứng dụng, giúp:

  • Tăng tốc quá trình phát triển
  • Dễ dàng thử nghiệm và sửa lỗi
  • Cải thiện workflow giữa nhà phát triển và nhà thiết kế

So sánh Flutter với các giải pháp đa nền tảng khác

Tiêu chíFlutterReact NativeXamarin
Ngôn ngữDartJavaScriptC#
Hiệu suấtCao (biên dịch ra mã máy)Trung bìnhCao
UIWidgets độc lậpThành phần NativeThành phần Native
Cộng đồngĐang phát triển nhanhLớnỔn định
Hỗ trợ bởiGoogleFacebookMicrosoft

Các thách thức khi phát triển đa nền tảng với Flutter

Mặc dù Flutter mang lại nhiều lợi ích, nhưng vẫn có một số thách thức:

  1. Kích thước ứng dụng: Ứng dụng Flutter thường lớn hơn một chút so với ứng dụng native do phải bao gồm framework.

  2. Tích hợp API đặc thù của nền tảng: Đôi khi cần viết code đặc biệt cho mỗi nền tảng để tương tác với các API riêng biệt.

  3. Đường cong học tập của Dart: Nhà phát triển mới cần làm quen với ngôn ngữ Dart.

Ví dụ mã nguồn Flutter đơn giản

Dưới đây là một ví dụ đơn giản về ứng dụng Flutter hoạt động trên cả iOS và Android:

import 'package:flutter/material.dart';

void main() {
runApp(MyApp());
}

class MyApp extends StatelessWidget {

Widget build(BuildContext context) {
return MaterialApp(
title: 'Flutter Demo',
theme: ThemeData(
primarySwatch: Colors.blue,
),
home: Scaffold(
appBar: AppBar(
title: Text('Flutter trên iOS và Android'),
),
body: Center(
child: Text(
'Ứng dụng này chạy trên cả iOS và Android!',
style: TextStyle(fontSize: 20),
),
),
),
);
}
}

Kết luận

Flutter đã mang đến một giải pháp mạnh mẽ cho việc phát triển ứng dụng đa nền tảng, đặc biệt là cho iOS và Android. Với những ưu điểm vượt trội về hiệu suất, UI đồng nhất và tốc độ phát triển, Flutter đang dần thay đổi cách các nhà phát triển tiếp cận việc xây dựng ứng dụng di động.

Nếu bạn đang cân nhắc một công nghệ để phát triển ứng dụng trên cả iOS và Android, Flutter chắc chắn là một lựa chọn đáng cân nhắc, đặc biệt là khi bạn muốn có một UI đẹp và hiệu suất cao với nguồn lực phát triển hạn chế.

Flutter Firebase Authentication

· 21 min read

Flutter Firebase Authentication

Hướng dẫn tích hợp Firebase Authentication vào ứng dụng Flutter để quản lý người dùng

Flutter Firebase Authentication

Firebase Authentication là một giải pháp xác thực người dùng mạnh mẽ và an toàn được phát triển bởi Google. Nó cung cấp các phương thức xác thực phổ biến như email/mật khẩu, xác thực qua mạng xã hội (Google, Facebook, Twitter,...), xác thực qua số điện thoại và nhiều phương thức khác. Trong bài viết này, chúng ta sẽ tìm hiểu cách tích hợp Firebase Authentication vào ứng dụng Flutter để xây dựng hệ thống quản lý người dùng hoàn chỉnh.

Mục lục

  1. Thiết lập dự án Firebase
  2. Cài đặt các gói phụ thuộc cần thiết
  3. Cấu hình Firebase cho ứng dụng Flutter
  4. Xây dựng các màn hình xác thực
  5. Xác thực với Email và Mật khẩu
  6. Xác thực với Google
  7. Xác thực với Facebook
  8. Xác thực với Số điện thoại
  9. Quản lý trạng thái người dùng
  10. Phân quyền và Bảo mật
  11. Các kỹ thuật nâng cao
  12. Xử lý lỗi
  13. Kết luận

1. Thiết lập dự án Firebase

Bước 1: Tạo dự án Firebase

  1. Truy cập Firebase Console
  2. Nhấp vào "Thêm dự án" (hoặc "Add project")
  3. Nhập tên dự án, ví dụ: "Flutter Auth Demo"
  4. Tùy chọn bật Google Analytics cho dự án (khuyến nghị)
  5. Nhấp "Tiếp tục" và làm theo các bước để hoàn thành quá trình tạo dự án

Bước 2: Bật Firebase Authentication

  1. Trong Firebase Console, chọn dự án vừa tạo
  2. Từ menu bên trái, chọn "Authentication"
  3. Nhấp vào tab "Sign-in method"
  4. Bật các phương thức xác thực mà bạn muốn sử dụng (ví dụ: Email/Password, Google, Facebook, Phone)
  5. Cấu hình thêm các thông tin cần thiết cho từng phương thức

Flutter Firebase Authentication

2. Cài đặt các gói phụ thuộc cần thiết

Mở file pubspec.yaml của dự án Flutter và thêm các gói sau:

dependencies:
flutter:
sdk: flutter
firebase_core: ^2.13.0
firebase_auth: ^4.6.1
google_sign_in: ^6.1.0
flutter_facebook_auth: ^5.0.11
provider: ^6.0.5

Chạy lệnh sau để cài đặt các gói:

flutter pub get

3. Cấu hình Firebase cho ứng dụng Flutter

Cấu hình cho Android

Bước 1: Đăng ký ứng dụng Android

  1. Trong Firebase Console, chọn dự án của bạn
  2. Nhấp vào biểu tượng Android để thêm ứng dụng Android
  3. Nhập ID gói của ứng dụng Android (ví dụ: com.example.flutter_auth_demo)
  4. (Tùy chọn) Nhập nickname cho ứng dụng
  5. Đăng ký ứng dụng

Bước 2: Tải xuống file cấu hình

  1. Tải xuống file google-services.json
  2. Đặt file này vào thư mục android/app của dự án Flutter

Bước 3: Cập nhật Gradle

Mở file android/build.gradle và thêm:

buildscript {
dependencies {
// ... other dependencies
classpath 'com.google.gms:google-services:4.3.15'
}
}

Mở file android/app/build.gradle và thêm:

// Bottom of the file
apply plugin: 'com.google.gms.google-services'

Cấu hình cho iOS

Bước 1: Đăng ký ứng dụng iOS

  1. Trong Firebase Console, chọn dự án của bạn
  2. Nhấp vào biểu tượng iOS để thêm ứng dụng iOS
  3. Nhập ID gói của ứng dụng iOS (ví dụ: com.example.flutterAuthDemo)
  4. (Tùy chọn) Nhập nickname cho ứng dụng
  5. Đăng ký ứng dụng

Bước 2: Tải xuống file cấu hình

  1. Tải xuống file GoogleService-Info.plist
  2. Sử dụng Xcode, thêm file này vào thư mục Runner của dự án (đảm bảo chọn "Copy items if needed")

Bước 3: Cập nhật Podfile

Mở file ios/Podfile và thêm:

platform :ios, '12.0'

4. Xây dựng các màn hình xác thực

Chúng ta sẽ xây dựng các màn hình xác thực cơ bản cho ứng dụng:

Màn hình đăng nhập (login_screen.dart)

import 'package:flutter/material.dart';
import 'package:firebase_auth/firebase_auth.dart';
import '../services/auth_service.dart';

class LoginScreen extends StatefulWidget {

_LoginScreenState createState() => _LoginScreenState();
}

class _LoginScreenState extends State<LoginScreen> {
final AuthService _authService = AuthService();
final _formKey = GlobalKey<FormState>();

String _email = '';
String _password = '';
String _error = '';
bool _isLoading = false;

void _signInWithEmailAndPassword() async {
if (_formKey.currentState!.validate()) {
setState(() {
_isLoading = true;
_error = '';
});

try {
await _authService.signInWithEmailAndPassword(_email, _password);
// Đăng nhập thành công, NavigationService sẽ điều hướng người dùng
} catch (e) {
setState(() {
_error = _handleFirebaseAuthError(e);
_isLoading = false;
});
}
}
}

String _handleFirebaseAuthError(dynamic e) {
if (e is FirebaseAuthException) {
switch (e.code) {
case 'user-not-found':
return 'Không tìm thấy tài khoản với email này.';
case 'wrong-password':
return 'Sai mật khẩu.';
case 'invalid-email':
return 'Email không hợp lệ.';
case 'user-disabled':
return 'Tài khoản đã bị vô hiệu hóa.';
default:
return 'Đăng nhập thất bại: ${e.message}';
}
}
return 'Đã xảy ra lỗi không xác định.';
}


Widget build(BuildContext context) {
return Scaffold(
appBar: AppBar(
title: Text('Đăng nhập'),
),
body: Center(
child: SingleChildScrollView(
padding: EdgeInsets.all(16.0),
child: Form(
key: _formKey,
child: Column(
crossAxisAlignment: CrossAxisAlignment.stretch,
children: [
Image.asset(
'assets/images/logo.png',
height: 100,
),
SizedBox(height: 48.0),
TextFormField(
decoration: InputDecoration(
labelText: 'Email',
border: OutlineInputBorder(),
prefixIcon: Icon(Icons.email),
),
keyboardType: TextInputType.emailAddress,
validator: (value) {
if (value == null || value.isEmpty) {
return 'Vui lòng nhập email';
}
return null;
},
onChanged: (value) {
_email = value.trim();
},
),
SizedBox(height: 16.0),
TextFormField(
decoration: InputDecoration(
labelText: 'Mật khẩu',
border: OutlineInputBorder(),
prefixIcon: Icon(Icons.lock),
),
obscureText: true,
validator: (value) {
if (value == null || value.isEmpty) {
return 'Vui lòng nhập mật khẩu';
}
return null;
},
onChanged: (value) {
_password = value;
},
),
SizedBox(height: 24.0),
if (_error.isNotEmpty)
Padding(
padding: EdgeInsets.only(bottom: 16.0),
child: Text(
_error,
style: TextStyle(color: Colors.red),
textAlign: TextAlign.center,
),
),
ElevatedButton(
onPressed: _isLoading ? null : _signInWithEmailAndPassword,
child: _isLoading
? CircularProgressIndicator(color: Colors.white)
: Text('ĐĂNG NHẬP'),
style: ElevatedButton.styleFrom(
padding: EdgeInsets.symmetric(vertical: 16.0),
),
),
SizedBox(height: 16.0),
OutlinedButton.icon(
icon: Image.asset(
'assets/images/google_logo.png',
height: 24.0,
),
label: Text('Đăng nhập với Google'),
onPressed: _isLoading
? null
: () async {
setState(() {
_isLoading = true;
_error = '';
});
try {
await _authService.signInWithGoogle();
// Đăng nhập thành công
} catch (e) {
setState(() {
_error = 'Đăng nhập Google thất bại: $e';
_isLoading = false;
});
}
},
style: OutlinedButton.styleFrom(
padding: EdgeInsets.symmetric(vertical: 12.0),
),
),
SizedBox(height: 16.0),
TextButton(
child: Text('Chưa có tài khoản? Đăng ký ngay'),
onPressed: () {
Navigator.pushNamed(context, '/register');
},
),
],
),
),
),
),
);
}
}

Màn hình đăng ký (register_screen.dart)

import 'package:flutter/material.dart';
import 'package:firebase_auth/firebase_auth.dart';
import '../services/auth_service.dart';

class RegisterScreen extends StatefulWidget {

_RegisterScreenState createState() => _RegisterScreenState();
}

class _RegisterScreenState extends State<RegisterScreen> {
final AuthService _authService = AuthService();
final _formKey = GlobalKey<FormState>();

String _email = '';
String _password = '';
String _confirmPassword = '';
String _error = '';
bool _isLoading = false;

void _registerWithEmailAndPassword() async {
if (_formKey.currentState!.validate()) {
setState(() {
_isLoading = true;
_error = '';
});

try {
await _authService.registerWithEmailAndPassword(_email, _password);
// Đăng ký thành công, NavigationService sẽ điều hướng người dùng
} catch (e) {
setState(() {
_error = _handleFirebaseAuthError(e);
_isLoading = false;
});
}
}
}

String _handleFirebaseAuthError(dynamic e) {
if (e is FirebaseAuthException) {
switch (e.code) {
case 'email-already-in-use':
return 'Email này đã được sử dụng.';
case 'invalid-email':
return 'Email không hợp lệ.';
case 'operation-not-allowed':
return 'Đăng ký với email và mật khẩu chưa được bật.';
case 'weak-password':
return 'Mật khẩu quá yếu.';
default:
return 'Đăng ký thất bại: ${e.message}';
}
}
return 'Đã xảy ra lỗi không xác định.';
}


Widget build(BuildContext context) {
return Scaffold(
appBar: AppBar(
title: Text('Đăng ký'),
),
body: Center(
child: SingleChildScrollView(
padding: EdgeInsets.all(16.0),
child: Form(
key: _formKey,
child: Column(
crossAxisAlignment: CrossAxisAlignment.stretch,
children: [
Image.asset(
'assets/images/logo.png',
height: 100,
),
SizedBox(height: 48.0),
TextFormField(
decoration: InputDecoration(
labelText: 'Email',
border: OutlineInputBorder(),
prefixIcon: Icon(Icons.email),
),
keyboardType: TextInputType.emailAddress,
validator: (value) {
if (value == null || value.isEmpty) {
return 'Vui lòng nhập email';
}
return null;
},
onChanged: (value) {
_email = value.trim();
},
),
SizedBox(height: 16.0),
TextFormField(
decoration: InputDecoration(
labelText: 'Mật khẩu',
border: OutlineInputBorder(),
prefixIcon: Icon(Icons.lock),
),
obscureText: true,
validator: (value) {
if (value == null || value.isEmpty) {
return 'Vui lòng nhập mật khẩu';
}
if (value.length < 6) {
return 'Mật khẩu phải có ít nhất 6 ký tự';
}
return null;
},
onChanged: (value) {
_password = value;
},
),
SizedBox(height: 16.0),
TextFormField(
decoration: InputDecoration(
labelText: 'Xác nhận mật khẩu',
border: OutlineInputBorder(),
prefixIcon: Icon(Icons.lock_outline),
),
obscureText: true,
validator: (value) {
if (value == null || value.isEmpty) {
return 'Vui lòng xác nhận mật khẩu';
}
if (value != _password) {
return 'Mật khẩu không khớp';
}
return null;
},
onChanged: (value) {
_confirmPassword = value;
},
),
SizedBox(height: 24.0),
if (_error.isNotEmpty)
Padding(
padding: EdgeInsets.only(bottom: 16.0),
child: Text(
_error,
style: TextStyle(color: Colors.red),
textAlign: TextAlign.center,
),
),
ElevatedButton(
onPressed: _isLoading ? null : _registerWithEmailAndPassword,
child: _isLoading
? CircularProgressIndicator(color: Colors.white)
: Text('ĐĂNG KÝ'),
style: ElevatedButton.styleFrom(
padding: EdgeInsets.symmetric(vertical: 16.0),
),
),
SizedBox(height: 16.0),
TextButton(
child: Text('Đã có tài khoản? Đăng nhập ngay'),
onPressed: () {
Navigator.pop(context);
},
),
],
),
),
),
),
);
}
}

5. Xác thực với Email và Mật khẩu

Tạo một service class để xử lý xác thực (lib/services/auth_service.dart):

import 'package:firebase_auth/firebase_auth.dart';

class AuthService {
final FirebaseAuth _auth = FirebaseAuth.instance;

// Lấy thông tin người dùng hiện tại
User? get currentUser => _auth.currentUser;

// Stream thông tin người dùng (để lắng nghe trạng thái đăng nhập)
Stream<User?> get authStateChanges => _auth.authStateChanges();

// Đăng nhập với email và mật khẩu
Future<UserCredential> signInWithEmailAndPassword(String email, String password) async {
try {
return await _auth.signInWithEmailAndPassword(
email: email,
password: password,
);
} catch (e) {
rethrow;
}
}

// Đăng ký với email và mật khẩu
Future<UserCredential> registerWithEmailAndPassword(String email, String password) async {
try {
return await _auth.createUserWithEmailAndPassword(
email: email,
password: password,
);
} catch (e) {
rethrow;
}
}

// Đăng xuất
Future<void> signOut() async {
await _auth.signOut();
}

// Quên mật khẩu
Future<void> resetPassword(String email) async {
await _auth.sendPasswordResetEmail(email: email);
}
}

6. Xác thực với Google

Bổ sung phương thức đăng nhập với Google vào AuthService:

import 'package:firebase_auth/firebase_auth.dart';
import 'package:google_sign_in/google_sign_in.dart';

class AuthService {
// ... (Các phương thức đã có)

// Đăng nhập với Google
Future<UserCredential> signInWithGoogle() async {
try {
// Bắt đầu quá trình đăng nhập Google
final GoogleSignInAccount? googleUser = await GoogleSignIn().signIn();

// Nếu người dùng hủy đăng nhập
if (googleUser == null) {
throw FirebaseAuthException(
code: 'sign_in_canceled',
message: 'Đăng nhập bị hủy bởi người dùng',
);
}

// Lấy thông tin xác thực từ request
final GoogleSignInAuthentication googleAuth = await googleUser.authentication;

// Tạo credential mới
final credential = GoogleAuthProvider.credential(
accessToken: googleAuth.accessToken,
idToken: googleAuth.idToken,
);

// Đăng nhập vào Firebase với credential
return await FirebaseAuth.instance.signInWithCredential(credential);
} catch (e) {
rethrow;
}
}
}

Cấu hình Google Sign-In cho Android

Thêm vào file android/app/build.gradle:

android {
defaultConfig {
// ...

// Thêm dòng này
multiDexEnabled true
}
}

Cấu hình Google Sign-In cho iOS

Thêm vào file ios/Runner/Info.plist:

<key>CFBundleURLTypes</key>
<array>
<dict>
<key>CFBundleTypeRole</key>
<string>Editor</string>
<key>CFBundleURLSchemes</key>
<array>
<!-- Thay YOUR_REVERSED_CLIENT_ID bằng giá trị từ GoogleService-Info.plist -->
<string>YOUR_REVERSED_CLIENT_ID</string>
</array>
</dict>
</array>

7. Xác thực với Facebook

Bổ sung phương thức đăng nhập với Facebook vào AuthService:

import 'package:firebase_auth/firebase_auth.dart';
import 'package:flutter_facebook_auth/flutter_facebook_auth.dart';

class AuthService {
// ... (Các phương thức đã có)

// Đăng nhập với Facebook
Future<UserCredential> signInWithFacebook() async {
try {
// Bắt đầu quá trình đăng nhập Facebook
final LoginResult result = await FacebookAuth.instance.login();

// Kiểm tra kết quả
if (result.status != LoginStatus.success) {
throw FirebaseAuthException(
code: 'facebook_login_failed',
message: 'Đăng nhập Facebook thất bại: ${result.message}',
);
}

// Tạo credential từ token
final OAuthCredential credential = FacebookAuthProvider.credential(result.accessToken!.token);

// Đăng nhập vào Firebase với credential
return await FirebaseAuth.instance.signInWithCredential(credential);
} catch (e) {
rethrow;
}
}
}

Cấu hình Facebook Login cho Android

Thêm vào file android/app/src/main/res/values/strings.xml (tạo nếu chưa có):

<?xml version="1.0" encoding="utf-8"?>
<resources>
<string name="facebook_app_id">YOUR_FACEBOOK_APP_ID</string>
<string name="fb_login_protocol_scheme">fbYOUR_FACEBOOK_APP_ID</string>
<string name="facebook_client_token">YOUR_FACEBOOK_CLIENT_TOKEN</string>
</resources>

Thêm vào file android/app/src/main/AndroidManifest.xml:

<manifest xmlns:android="http://schemas.android.com/apk/res/android"
package="com.example.your_app">
<!-- ... -->
<application>
<!-- ... -->

<meta-data
android:name="com.facebook.sdk.ApplicationId"
android:value="@string/facebook_app_id"/>
<meta-data
android:name="com.facebook.sdk.ClientToken"
android:value="@string/facebook_client_token"/>

<activity
android:name="com.facebook.FacebookActivity"
android:configChanges="keyboard|keyboardHidden|screenLayout|screenSize|orientation"
android:label="@string/app_name" />
<activity
android:name="com.facebook.CustomTabActivity"
android:exported="true">
<intent-filter>
<action android:name="android.intent.action.VIEW" />
<category android:name="android.intent.category.DEFAULT" />
<category android:name="android.intent.category.BROWSABLE" />
<data android:scheme="@string/fb_login_protocol_scheme" />
</intent-filter>
</activity>

</application>
</manifest>

Cấu hình Facebook Login cho iOS

Thêm vào file ios/Runner/Info.plist:

<key>CFBundleURLTypes</key>
<array>
<!-- ... Các URL types khác -->
<dict>
<key>CFBundleURLSchemes</key>
<array>
<string>fbYOUR_FACEBOOK_APP_ID</string>
</array>
</dict>
</array>
<key>FacebookAppID</key>
<string>YOUR_FACEBOOK_APP_ID</string>
<key>FacebookClientToken</key>
<string>YOUR_FACEBOOK_CLIENT_TOKEN</string>
<key>FacebookDisplayName</key>
<string>YOUR_APP_NAME</string>
<key>LSApplicationQueriesSchemes</key>
<array>
<string>fbapi</string>
<string>fb-messenger-share-api</string>
<string>fbauth2</string>
<string>fbshareextension</string>
</array>

8. Xác thực với Số điện thoại

Bổ sung phương thức đăng nhập với số điện thoại vào AuthService:

class AuthService {
// ... (Các phương thức đã có)

// Xác thực số điện thoại - Bước 1: Gửi OTP
Future<void> verifyPhoneNumber({
required String phoneNumber,
required Function(PhoneAuthCredential) verificationCompleted,
required Function(FirebaseAuthException) verificationFailed,
required Function(String, int?) codeSent,
required Function(String) codeAutoRetrievalTimeout,
}) async {
await _auth.verifyPhoneNumber(
phoneNumber: phoneNumber,
verificationCompleted: verificationCompleted,
verificationFailed: verificationFailed,
codeSent: codeSent,
codeAutoRetrievalTimeout: codeAutoRetrievalTimeout,
timeout: Duration(seconds: 60),
);
}

// Xác thực số điện thoại - Bước 2: Xác nhận OTP
Future<UserCredential> signInWithPhoneCredential(PhoneAuthCredential credential) async {
try {
return await _auth.signInWithCredential(credential);
} catch (e) {
rethrow;
}
}
}

Tạo màn hình xác thực số điện thoại (phone_auth_screen.dart):

import 'package:flutter/material.dart';
import 'package:firebase_auth/firebase_auth.dart';
import '../services/auth_service.dart';

class PhoneAuthScreen extends StatefulWidget {

_PhoneAuthScreenState createState() => _PhoneAuthScreenState();
}

class _PhoneAuthScreenState extends State<PhoneAuthScreen> {
final AuthService _authService = AuthService();
final _formKey = GlobalKey<FormState>();

String _phoneNumber = '';
String _smsCode = '';
String _verificationId = '';
String _error = '';
bool _isLoading = false;
bool _codeSent = false;

void _verifyPhoneNumber() async {
if (_formKey.currentState!.validate()) {
setState(() {
_isLoading = true;
_error = '';
});

try {
await _authService.verifyPhoneNumber(
phoneNumber: _phoneNumber,
verificationCompleted: (PhoneAuthCredential credential) async {
// Tự động xác thực (Android)
try {
await _authService.signInWithPhoneCredential(credential);
// Đăng nhập thành công
} catch (e) {
setState(() {
_error = 'Xác thực thất bại: $e';
_isLoading = false;
});
}
},
verificationFailed: (FirebaseAuthException e) {
setState(() {
_error = 'Xác thực thất bại: ${e.message}';
_isLoading = false;
});
},
codeSent: (String verificationId, int? resendToken) {
setState(() {
_verificationId = verificationId;
_codeSent = true;
_isLoading = false;
});
},
codeAutoRetrievalTimeout: (String verificationId) {
_verificationId = verificationId;
},
);
} catch (e) {
setState(() {
_error = 'Lỗi gửi mã: $e';
_isLoading = false;
});
}
}
}

void _signInWithSmsCode() async {
if (_formKey.currentState!.validate()) {
setState(() {
_isLoading = true;
_error = '';
});

try {
PhoneAuthCredential credential = PhoneAuthProvider.credential(
verificationId: _verificationId,
smsCode: _smsCode,
);

await _authService.signInWithPhoneCredential(credential);
// Đăng nhập thành công
} catch (e) {
setState(() {
_error = 'Xác thực thất bại: $e';
_isLoading = false;
});
}
}
}


Widget build(BuildContext context) {
return Scaffold(
appBar: AppBar(
title: Text('Đăng nhập với Số điện thoại'),
),
body: Center(
child: SingleChildScrollView(
padding: EdgeInsets.all(16.0),
child: Form(
key: _formKey,
child: Column(
crossAxisAlignment: CrossAxisAlignment.stretch,
children: [
Image.asset(
'assets/images/logo.png',
height: 100,
),
SizedBox(height: 48.0),
if (!_codeSent) ...[
TextFormField(
decoration: InputDecoration(
labelText: 'Số điện thoại (định dạng: +84...)',
border: OutlineInputBorder(),
prefixIcon: Icon(Icons.phone),
),
keyboardType: TextInputType.phone,
validator: (value) {
if (value == null || value.isEmpty) {
return 'Vui lòng nhập số điện thoại';
}
return null;
},
onChanged: (value) {
_phoneNumber = value.trim();
},
),
] else ...[
TextFormField(
decoration: InputDecoration(
labelText: 'Mã xác thực (OTP)',
border: OutlineInputBorder(),
prefixIcon: Icon(Icons.sms),
),
keyboardType: TextInputType.number,
validator: (value) {
if (value == null || value.isEmpty) {
return 'Vui lòng nhập mã xác thực';
}
return null;
},
onChanged: (value) {
_smsCode = value.trim();
},
),
],
SizedBox(height: 24.0),
if (_error.isNotEmpty)
Padding(
padding: EdgeInsets.only(bottom: 16.0),
child: Text(
_error,
style: TextStyle(color: Colors.red),
textAlign: TextAlign.center,
),
),
ElevatedButton(
onPressed: _isLoading
? null
: (_codeSent ? _signInWithSmsCode : _verifyPhoneNumber),
child: _isLoading
? CircularProgressIndicator(color: Colors.white)
: Text(_codeSent ? 'XÁC THỰC' : 'GỬI MÃ XÁC THỰC'),
style: ElevatedButton.styleFrom(
padding: EdgeInsets.symmetric(vertical: 16.0),
),
),
if (_codeSent) ...[
SizedBox(height: 16.0),
TextButton(
child: Text('Gửi lại mã'),
onPressed: _isLoading ? null : _verifyPhoneNumber,
),
],
],
),
),
),
),
);
}
}

9. Quản lý trạng thái người dùng

Sử dụng Provider để quản lý trạng thái người dùng trong ứng dụng (lib/providers/auth_provider.dart):

import 'package:flutter/material.dart';
import 'package:firebase_auth/firebase_auth.dart';
import '../services/auth_service.dart';

class AuthProvider with ChangeNotifier {
final AuthService _authService = AuthService();
User? _user;
bool _isLoading = false;

AuthProvider() {
_init();
}

void _init() {
_authService.authStateChanges.listen((User? user) {
_user = user;
notifyListeners();
});
}

User? get user => _user;
bool get isAuthenticated => _user != null;
bool get isLoading => _isLoading;

void setLoading(bool value) {
_isLoading = value;
notifyListeners();
}

Future<void> signInWithEmailAndPassword(String email, String password) async {
try {
setLoading(true);
await _authService.signInWithEmailAndPassword(email, password);
} finally {
setLoading(false);
}
}

Future<void> registerWithEmailAndPassword(String email, String password) async {
try {
setLoading(true);
await _authService.registerWithEmailAndPassword(email, password);
} finally {
setLoading(false);
}
}

Future<void> signInWithGoogle() async {
try {
setLoading(true);
await _authService.signInWithGoogle();
} finally {
setLoading(false);
}
}

Future<void> signInWithFacebook() async {
try {
setLoading(true);
await _authService.signInWithFacebook();
} finally {
setLoading(false);
}
}

Future<void> signOut() async {
try {
setLoading(true);
await _authService.signOut();
} finally {
setLoading(false);
}
}
}

Cập nhật main.dart để sử dụng Provider:

import 'package:flutter/material.dart';
import 'package:firebase_core/firebase_core.dart';
import 'package:provider/provider.dart';
import 'providers/auth_provider.dart';
import 'screens/login_screen.dart';
import 'screens/register_screen.dart';
import 'screens/home_screen.dart';
import 'screens/phone_auth_screen.dart';

void main() async {
WidgetsFlutterBinding.ensureInitialized();
await Firebase.initializeApp();
runApp(MyApp());
}

class MyApp extends StatelessWidget {

Widget build(BuildContext context) {
return MultiProvider(
providers: [
ChangeNotifierProvider(create: (_) => AuthProvider()),
],
child: Consumer<AuthProvider>(
builder: (context, authProvider, _) {
return MaterialApp(
title: 'Flutter Firebase Auth',
theme: ThemeData(
primarySwatch: Colors.blue,
visualDensity: VisualDensity.adaptivePlatformDensity,
),
initialRoute: authProvider.isAuthenticated ? '/home' : '/login',
routes: {
'/login': (context) => LoginScreen(),
'/register': (context) => RegisterScreen(),
'/home': (context) => HomeScreen(),
'/phone': (context) => PhoneAuthScreen(),
},
);
},
),
);
}
}

10. Phân quyền và Bảo mật

Để bảo vệ các tuyến đường chỉ cho người dùng đã xác thực, tạo một auth_guard.dart:

import 'package:flutter/material.dart';
import 'package:provider/provider.dart';
import '../providers/auth_provider.dart';

class AuthGuard extends StatelessWidget {
final Widget child;
final String redirectRoute;

const AuthGuard({
Key? key,
required this.child,
this.redirectRoute = '/login',
}) : super(key: key);


Widget build(BuildContext context) {
return Consumer<AuthProvider>(
builder: (context, authProvider, _) {
if (authProvider.isAuthenticated) {
return child;
} else {
// Điều hướng đến trang đăng nhập sau khi render
WidgetsBinding.instance.addPostFrameCallback((_) {
Navigator.of(context).pushReplacementNamed(redirectRoute);
});

// Trả về một widget đơn giản trong khi chờ điều hướng
return Scaffold(
body: Center(
child: CircularProgressIndicator(),
),
);
}
},
);
}
}

Sử dụng trong tuyến đường cần bảo vệ:

// Trong home_screen.dart

Widget build(BuildContext context) {
return AuthGuard(
child: Scaffold(
appBar: AppBar(
title: Text('Trang chủ'),
actions: [
IconButton(
icon: Icon(Icons.exit_to_app),
onPressed: () {
Provider.of<AuthProvider>(context, listen: false).signOut();
},
),
],
),
body: Center(
child: Text('Đã đăng nhập thành công!'),
),
),
);
}

11. Các kỹ thuật nâng cao

11.1. Quản lý thông tin người dùng với Firestore

Tạo một service để quản lý thông tin người dùng trong Firestore (user_service.dart):

import 'package:cloud_firestore/cloud_firestore.dart';
import 'package:firebase_auth/firebase_auth.dart';

class UserService {
final FirebaseFirestore _firestore = FirebaseFirestore.instance;
final FirebaseAuth _auth = FirebaseAuth.instance;

Future<void> createUserProfile(User user, {Map<String, dynamic>? additionalData}) async {
final Map<String, dynamic> userData = {
'email': user.email,
'displayName': user.displayName,
'photoURL': user.photoURL,
'phoneNumber': user.phoneNumber,
'lastLogin': FieldValue.serverTimestamp(),
'createdAt': FieldValue.serverTimestamp(),
...?additionalData,
};

await _firestore.collection('users').doc(user.uid).set(userData, SetOptions(merge: true));
}

Future<DocumentSnapshot> getUserProfile(String userId) async {
return await _firestore.collection('users').doc(userId).get();
}

Future<void> updateUserProfile(String userId, Map<String, dynamic> data) async {
await _firestore.collection('users').doc(userId).update(data);
}

Stream<DocumentSnapshot> getUserProfileStream(String userId) {
return _firestore.collection('users').doc(userId).snapshots();
}

Future<void> updateCurrentUserProfile(Map<String, dynamic> data) async {
final user = _auth.currentUser;
if (user != null) {
await updateUserProfile(user.uid, data);
} else {
throw Exception('Không có người dùng đang đăng nhập');
}
}
}

11.2. Xử lý phiên đăng nhập

Bổ sung chức năng xác thực lại sau một khoảng thời gian nhất định:

class AuthService {
// ... (Các phương thức đã có)

// Xác thực lại người dùng hiện tại
Future<void> reauthenticateUser(String password) async {
try {
User? user = _auth.currentUser;
if (user == null || user.email == null) {
throw Exception('Không thể xác thực lại. Không có thông tin người dùng.');
}

AuthCredential credential = EmailAuthProvider.credential(
email: user.email!,
password: password,
);

await user.reauthenticateWithCredential(credential);
} catch (e) {
rethrow;
}
}

// Thay đổi mật khẩu (yêu cầu xác thực lại trước)
Future<void> changePassword(String newPassword) async {
try {
User? user = _auth.currentUser;
if (user == null) {
throw Exception('Không có người dùng đang đăng nhập');
}

await user.updatePassword(newPassword);
} catch (e) {
rethrow;
}
}

// Kiểm tra thời gian đăng nhập gần nhất
Future<bool> isSessionValid(int maxAgeMinutes) async {
try {
User? user = _auth.currentUser;
if (user == null) {
return false;
}

// Làm mới token người dùng để cập nhật metadata
await user.getIdToken(true);

// Lấy metadata
final metadata = await user.metadata;
final lastSignInTime = metadata.lastSignInTime;

if (lastSignInTime == null) {
return false;
}

final now = DateTime.now();
final diff = now.difference(lastSignInTime).inMinutes;

return diff <= maxAgeMinutes;
} catch (e) {
return false;
}
}
}

11.3. Xác thực hai yếu tố (2FA)

class AuthService {
// ... (Các phương thức đã có)

// Bật xác thực hai yếu tố
Future<String> enableTwoFactorAuth() async {
try {
User? user = _auth.currentUser;
if (user == null) {
throw Exception('Không có người dùng đang đăng nhập');
}

// Tạo URI để cấu hình ứng dụng xác thực (như Google Authenticator)
final appName = 'YourAppName';
final email = user.email ?? user.uid;
final secret = _generateSecret(); // Implement this method

final uri = 'otpauth://totp/$appName:$email?secret=$secret&issuer=$appName';

// Lưu secret vào Firestore (User document)
await FirebaseFirestore.instance.collection('users').doc(user.uid).update({
'twoFactorEnabled': true,
'twoFactorSecret': secret,
});

return uri;
} catch (e) {
rethrow;
}
}

// Xác minh mã OTP
Future<bool> verifyOtp(String otp) async {
try {
User? user = _auth.currentUser;
if (user == null) {
throw Exception('Không có người dùng đang đăng nhập');
}

// Lấy secret từ Firestore
final doc = await FirebaseFirestore.instance.collection('users').doc(user.uid).get();
final secret = doc.data()?['twoFactorSecret'];

if (secret == null) {
throw Exception('Xác thực hai yếu tố chưa được bật');
}

// Xác minh OTP
return _verifyOtp(secret, otp); // Implement this method
} catch (e) {
rethrow;
}
}
}

12. Xử lý lỗi

Tạo một helper class để xử lý các lỗi liên quan đến Firebase Auth (auth_error_handler.dart):

class AuthErrorHandler {
static String handleAuthError(dynamic error) {
if (error is FirebaseAuthException) {
switch (error.code) {
// Email/Password Auth Errors
case 'email-already-in-use':
return 'Email này đã được sử dụng bởi một tài khoản khác.';
case 'invalid-email':
return 'Email không hợp lệ.';
case 'user-disabled':
return 'Tài khoản này đã bị vô hiệu hóa.';
case 'user-not-found':
return 'Không tìm thấy tài khoản với email này.';
case 'wrong-password':
return 'Sai mật khẩu.';
case 'weak-password':
return 'Mật khẩu quá yếu.';
case 'operation-not-allowed':
return 'Phương thức đăng nhập này không được cho phép.';

// Phone Auth Errors
case 'invalid-phone-number':
return 'Số điện thoại không hợp lệ.';
case 'missing-phone-number':
return 'Vui lòng nhập số điện thoại.';
case 'quota-exceeded':
return 'Đã vượt quá giới hạn SMS, vui lòng thử lại sau.';
case 'session-expired':
return 'Phiên xác thực đã hết hạn, vui lòng gửi lại mã.';
case 'invalid-verification-code':
return 'Mã xác thực không hợp lệ.';

// Google/Facebook Auth Errors
case 'account-exists-with-different-credential':
return 'Đã tồn tại tài khoản với email này nhưng sử dụng phương thức đăng nhập khác.';
case 'invalid-credential':
return 'Thông tin xác thực không hợp lệ.';
case 'operation-not-supported-in-this-environment':
return 'Phương thức xác thực này không được hỗ trợ trên nền tảng hiện tại.';
case 'popup-blocked':
return 'Cửa sổ đăng nhập bị chặn. Vui lòng cho phép cửa sổ bật lên và thử lại.';
case 'popup-closed-by-user':
return 'Cửa sổ đăng nhập đã bị đóng trước khi hoàn tất quá trình xác thực.';

// General Auth Errors
case 'network-request-failed':
return 'Lỗi kết nối mạng. Vui lòng kiểm tra kết nối của bạn và thử lại.';
case 'too-many-requests':
return 'Quá nhiều yêu cầu không thành công. Vui lòng thử lại sau.';
case 'internal-error':
return 'Đã xảy ra lỗi nội bộ. Vui lòng thử lại sau.';

default:
return 'Đã xảy ra lỗi: ${error.message}';
}
}

return 'Đã xảy ra lỗi không xác định.';
}
}

13. Kết luận

Flutter Firebase Authentication

Firebase Authentication cung cấp một giải pháp xác thực mạnh mẽ và linh hoạt cho ứng dụng Flutter của bạn. Việc tích hợp Firebase Authentication giúp bạn:

  1. Tiết kiệm thời gian phát triển: Không cần xây dựng hệ thống xác thực từ đầu
  2. Bảo mật cao: Firebase cung cấp các cơ chế bảo mật tiên tiến
  3. Hỗ trợ nhiều phương thức xác thực: Email/mật khẩu, Google, Facebook, số điện thoại,...
  4. Dễ dàng mở rộng: Liên kết với Firebase Firestore để lưu trữ thông tin người dùng
  5. Quản lý người dùng đơn giản: Giao diện Firebase Console thân thiện

Bằng cách tích hợp Firebase Authentication vào ứng dụng Flutter, bạn đã xây dựng một hệ thống xác thực toàn diện, bảo mật, và dễ dàng mở rộng. Hệ thống này có thể đáp ứng nhu cầu của các ứng dụng từ đơn giản đến phức tạp, giúp bạn tập trung vào phát triển các tính năng cốt lõi của ứng dụng.

Hãy luôn cập nhật các gói Firebase mới nhất để đảm bảo ứng dụng của bạn luôn nhận được các cải tiến và bản vá bảo mật mới nhất.

Tài nguyên học tập thêm:

Chúc bạn thành công trong việc xây dựng hệ thống xác thực cho ứng dụng Flutter!

Flutter có khó để học không?

· 4 min read
Tiger STEAM
Technical Instructor

Đường cong học tập Flutter

Flutter có khó để học không?

Flutter đang nổi lên như một trong những framework phát triển ứng dụng đa nền tảng phổ biến nhất hiện nay. Tuy nhiên, với người mới bắt đầu, câu hỏi "Flutter có khó để học không?" luôn là mối quan tâm hàng đầu. Hãy cùng tìm hiểu qua bài viết này.

Flutter là gì?

Flutter là một UI toolkit của Google, giúp xây dựng ứng dụng đa nền tảng từ một codebase duy nhất. Với Flutter, bạn có thể phát triển ứng dụng cho:

  • Android
  • iOS
  • Web
  • Desktop (Windows, macOS, Linux)

Đánh giá mức độ khó học của Flutter

1. Những điểm dễ học của Flutter

Cú pháp Dart dễ tiếp cận

Dart - ngôn ngữ lập trình được sử dụng trong Flutter - có cú pháp khá giống với các ngôn ngữ phổ biến như Java, JavaScript, và C#. Nếu bạn đã có kinh nghiệm với một trong các ngôn ngữ này, việc học Dart sẽ không quá khó khăn.

void main() {
print('Hello, Flutter!');

// Khai báo biến
var name = 'Flutter Developer';

// Sử dụng điều kiện
if (name.contains('Flutter')) {
print('Bạn đang học Flutter!');
}
}

Tài liệu phong phú

Flutter có tài liệu hướng dẫn chi tiết và cộng đồng hỗ trợ tích cực. Bạn có thể dễ dàng tìm thấy:

  • Tài liệu chính thức từ Google
  • Khóa học trực tuyến
  • Hướng dẫn trên YouTube
  • Các bài viết tutorial chi tiết

Hot-reload giúp học nhanh hơn

Tính năng hot-reload của Flutter cho phép nhìn thấy kết quả thay đổi code ngay lập tức, giúp quá trình học trở nên trực quan và nhanh chóng hơn.

2. Những thách thức khi học Flutter

Tư duy theo widget

Flutter xây dựng giao diện bằng cách kết hợp các widget với nhau. Tư duy này có thể khó làm quen nếu bạn đã quen với cách tiếp cận truyền thống như XML hoặc código riêng biệt cho UI.


Widget build(BuildContext context) {
return Scaffold(
appBar: AppBar(
title: Text('Flutter Demo'),
),
body: Center(
child: Column(
mainAxisAlignment: MainAxisAlignment.center,
children: <Widget>[
Text('Hello Flutter'),
ElevatedButton(
onPressed: () {},
child: Text('Click Me'),
),
],
),
),
);
}

Quản lý state

Hiểu và triển khai quản lý state trong Flutter là một trong những thách thức lớn nhất. Có nhiều cách tiếp cận như:

  • StatefulWidget
  • Provider
  • Bloc/Cubit
  • GetX
  • Redux
  • Riverpod

Việc quyết định sử dụng phương pháp nào phù hợp nhất với dự án có thể gây khó khăn cho người mới bắt đầu.

Lộ trình học Flutter hiệu quả

Để học Flutter một cách hiệu quả, bạn nên tuân theo lộ trình sau:

  1. Học cơ bản về Dart - Hiểu ngôn ngữ trước khi đi sâu vào framework
  2. Làm quen với các widget cơ bản - Buttons, Text, Container, Row, Column...
  3. Hiểu về layout và styling - Cách sắp xếp và tạo kiểu cho widgets
  4. Học về StatelessWidget và StatefulWidget - Cơ chế cơ bản của state
  5. Tìm hiểu navigation và routing - Cách điều hướng giữa các màn hình
  6. Khám phá cách gọi API và xử lý dữ liệu - Http, JSON parsing
  7. Đi sâu vào quản lý state nâng cao - Provider, Bloc, Redux...
  8. Học cách sử dụng các package phổ biến - Những công cụ cộng đồng hữu ích

Kết luận

Flutter không dễ cũng không quá khó để học - đặc biệt nếu bạn đã có kinh nghiệm lập trình trước đó. Như bất kỳ công nghệ mới nào, việc học Flutter đòi hỏi thời gian, kiên nhẫn và thực hành.

Đường cong học tập của Flutter có thể dốc hơn ở giai đoạn đầu khi làm quen với tư duy widget và quản lý state, nhưng sẽ dễ dàng hơn khi bạn đã nắm vững các khái niệm cơ bản.

Lời khuyên cuối cùng: Học bằng cách thực hành - xây dựng các dự án thực tế là cách tốt nhất để thành thạo Flutter!


Bạn đã có kinh nghiệm học Flutter? Hãy chia sẻ trải nghiệm của bạn trong phần bình luận bên dưới!

Hướng dẫn học Flutter cho người mới bắt đầu

· 12 min read

Hướng dẫn học Flutter cho người mới bắt đầu

Lộ trình học Flutter từ cơ bản đến nâng cao, bao gồm cài đặt môi trường và viết ứng dụng đầu tiên

Hướng dẫn học Flutter

Giới thiệu về Flutter

Flutter là một framework phát triển ứng dụng di động mã nguồn mở được phát triển bởi Google. Với Flutter, bạn có thể xây dựng ứng dụng di động chất lượng cao cho iOS và Android từ một codebase duy nhất. Không chỉ dừng lại ở ứng dụng di động, Flutter còn hỗ trợ phát triển ứng dụng cho Web, macOS, Windows và Linux.

Những ưu điểm nổi bật của Flutter:

  1. Cross-platform: Viết mã một lần và chạy trên nhiều nền tảng
  2. Hot Reload: Thay đổi code và thấy kết quả ngay lập tức
  3. UI đẹp và linh hoạt: Hỗ trợ tùy biến UI tới từng pixel
  4. Hiệu năng cao: Hiệu suất gần như tương đương với ứng dụng native
  5. Cộng đồng lớn mạnh: Nhiều package và plugin hỗ trợ

Lộ trình học Flutter từ cơ bản đến nâng cao

Giai đoạn 1: Nền tảng và thiết lập

1.1. Học Dart

Dart là ngôn ngữ lập trình được sử dụng trong Flutter. Trước khi bắt đầu với Flutter, bạn nên làm quen với Dart.

Các khái niệm cơ bản về Dart cần nắm:

// Khai báo biến
var name = 'Nguyễn Văn A'; // Kiểu được suy ra
String city = 'Hà Nội'; // Kiểu tường minh
final age = 25; // Không thể thay đổi sau khi gán
const PI = 3.14; // Hằng số biên dịch

// Hàm trong Dart
int add(int a, int b) {
return a + b;
}

// Hàm mũi tên (Arrow function)
int multiply(int a, int b) => a * b;

// Lớp trong Dart
class Person {
String name;
int age;

Person(this.name, this.age); // Constructor ngắn gọn

void introduce() {
print('Xin chào, tôi là $name, $age tuổi.');
}
}

Tài nguyên học Dart:

1.2. Cài đặt Flutter SDK

Bước 1: Tải Flutter SDK

Truy cập trang tải xuống Flutter và tải xuống phiên bản phù hợp với hệ điều hành của bạn.

Bước 2: Giải nén file đã tải xuống

Giải nén file đã tải xuống vào thư mục bạn muốn cài đặt Flutter, ví dụ:

  • Windows: C:\dev\flutter
  • macOS/Linux: ~/dev/flutter

Bước 3: Cập nhật biến môi trường PATH

Thêm thư mục flutter/bin vào biến môi trường PATH:

  • Windows:

    • Tìm kiếm "environment variables" trong menu Start
    • Chọn "Edit the system environment variables"
    • Nhấn "Environment Variables"
    • Trong "System variables", chọn "Path" và click "Edit"
    • Thêm đường dẫn đến thư mục flutter\bin
    • Nhấn "OK" để lưu
  • macOS/Linux:

    • Mở file ~/.bashrc, ~/.bash_profile, hoặc ~/.zshrc (tùy theo shell bạn đang sử dụng)
    • Thêm dòng sau: export PATH="$PATH:[đường dẫn đến thư mục flutter]/bin"
    • Lưu file và chạy source ~/.bashrc (hoặc file tương ứng)

Bước 4: Kiểm tra cài đặt

Mở terminal hoặc command prompt và chạy lệnh:

flutter doctor

Lệnh này sẽ kiểm tra cài đặt Flutter và báo cáo bất kỳ phụ thuộc nào còn thiếu. Hãy làm theo hướng dẫn để hoàn tất cài đặt.

1.3. Cài đặt IDE

Flutter làm việc tốt với nhiều IDE:

  • Visual Studio Code:

    • Tải và cài đặt từ trang chủ VS Code
    • Cài đặt extension "Flutter" từ marketplace
  • Android Studio / IntelliJ IDEA:

1.4. Tạo ứng dụng Flutter đầu tiên

Bằng dòng lệnh:

flutter create my_first_app
cd my_first_app
flutter run

Bằng IDE:

  • Trong VS Code: Nhấn Ctrl+Shift+P (hoặc Cmd+Shift+P trên macOS), chọn "Flutter: New Project"
  • Trong Android Studio: Chọn "Start a new Flutter project"

Giai đoạn 2: Học các khái niệm cơ bản của Flutter

2.1. Widgets - Nền tảng UI của Flutter

Flutter sử dụng Widgets để xây dựng giao diện người dùng. Tất cả trong Flutter đều là widgets, từ một nút bấm đơn giản đến cả ứng dụng.

Các loại widget cơ bản:

// StatelessWidget - Widget không có trạng thái
class MyStatelessWidget extends StatelessWidget {

Widget build(BuildContext context) {
return Container(
child: Text('Hello, Flutter!'),
);
}
}

// StatefulWidget - Widget có trạng thái
class MyStatefulWidget extends StatefulWidget {

_MyStatefulWidgetState createState() => _MyStatefulWidgetState();
}

class _MyStatefulWidgetState extends State<MyStatefulWidget> {
int _counter = 0;

void _incrementCounter() {
setState(() {
_counter++;
});
}


Widget build(BuildContext context) {
return Column(
children: [
Text('Số lần nhấn: $_counter'),
ElevatedButton(
onPressed: _incrementCounter,
child: Text('Tăng'),
),
],
);
}
}

2.2. Layout trong Flutter

Hiểu cách sắp xếp và bố trí widgets là rất quan trọng trong Flutter.

Các widget layout phổ biến:

  • Container: Widget đa năng để tùy chỉnh, tạo padding, margin, trang trí...
  • Row và Column: Sắp xếp widget theo chiều ngang hoặc dọc
  • Stack: Chồng các widget lên nhau
  • Expanded và Flexible: Kiểm soát không gian mà widget chiếm trong Row hoặc Column
// Ví dụ về Column và Row
Widget build(BuildContext context) {
return Column(
mainAxisAlignment: MainAxisAlignment.center,
crossAxisAlignment: CrossAxisAlignment.start,
children: [
Text('Dòng 1'),
Text('Dòng 2'),
Row(
mainAxisAlignment: MainAxisAlignment.spaceEvenly,
children: [
Icon(Icons.star),
Icon(Icons.star),
Icon(Icons.star),
],
),
],
);
}

2.3. State Management

Quản lý trạng thái (State Management) là một trong những khía cạnh quan trọng của Flutter.

Các phương pháp quản lý trạng thái:

  1. setState(): Phương pháp cơ bản cho các ứng dụng đơn giản
  2. Provider: Dễ học và được Flutter khuyên dùng
  3. Bloc/Cubit: Mạnh mẽ, phù hợp cho ứng dụng lớn
  4. GetX: All-in-one, đơn giản hóa nhiều tác vụ
  5. Riverpod: Cải tiến từ Provider

Ví dụ đơn giản với Provider:

// Định nghĩa model
class Counter {
int value = 0;

void increment() {
value++;
}
}

// Sử dụng trong app
void main() {
runApp(
ChangeNotifierProvider(
create: (context) => Counter(),
child: MyApp(),
),
);
}

// Tiêu thụ trong Widget
class CounterDisplay extends StatelessWidget {

Widget build(BuildContext context) {
return Text(
'${context.watch<Counter>().value}',
style: Theme.of(context).textTheme.headline4,
);
}
}

Giai đoạn 3: Xây dựng ứng dụng thực tế

3.1. Navigation và Routing

Điều hướng giữa các màn hình là phần cơ bản của hầu hết các ứng dụng.

// Điều hướng cơ bản
Navigator.push(
context,
MaterialPageRoute(builder: (context) => SecondScreen()),
);

// Điều hướng có tên (Named Routes)
Navigator.pushNamed(context, '/second');

// Định nghĩa routes
MaterialApp(
routes: {
'/': (context) => HomeScreen(),
'/second': (context) => SecondScreen(),
'/detail': (context) => DetailScreen(),
},
);

3.2. Networking và API

Hầu hết các ứng dụng cần giao tiếp với API.

// Sử dụng package http
import 'package:http/http.dart' as http;
import 'dart:convert';

Future<List<Post>> fetchPosts() async {
final response = await http.get(Uri.parse('https://jsonplaceholder.typicode.com/posts'));

if (response.statusCode == 200) {
List<dynamic> body = jsonDecode(response.body);
return body.map((item) => Post.fromJson(item)).toList();
} else {
throw Exception('Failed to load posts');
}
}

// Định nghĩa model
class Post {
final int id;
final String title;
final String body;

Post({required this.id, required this.title, required this.body});

factory Post.fromJson(Map<String, dynamic> json) {
return Post(
id: json['id'],
title: json['title'],
body: json['body'],
);
}
}

3.3. Lưu trữ cục bộ

Flutter cung cấp nhiều cách để lưu trữ dữ liệu cục bộ.

// Sử dụng SharedPreferences
import 'package:shared_preferences/shared_preferences.dart';

// Lưu dữ liệu
Future<void> saveData() async {
final prefs = await SharedPreferences.getInstance();
await prefs.setString('username', 'NguyenVanA');
await prefs.setInt('age', 25);
await prefs.setBool('isLoggedIn', true);
}

// Đọc dữ liệu
Future<void> readData() async {
final prefs = await SharedPreferences.getInstance();
final username = prefs.getString('username') ?? 'Guest';
final age = prefs.getInt('age') ?? 0;
final isLoggedIn = prefs.getBool('isLoggedIn') ?? false;

print('Username: $username, Age: $age, Logged in: $isLoggedIn');
}

Giai đoạn 4: Nâng cao kỹ năng

4.1. Animations

Animations làm cho ứng dụng trở nên sinh động và thú vị hơn.

// Animation cơ bản với AnimatedContainer
AnimatedContainer(
duration: Duration(seconds: 1),
curve: Curves.fastOutSlowIn,
width: _expanded ? 200 : 100,
height: _expanded ? 100 : 50,
color: _expanded ? Colors.blue : Colors.red,
child: Center(child: Text('Nhấn vào tôi')),
);

// Controller-based Animation
class _MyAnimationState extends State<MyAnimation> with SingleTickerProviderStateMixin {
late AnimationController _controller;
late Animation<double> _animation;


void initState() {
super.initState();
_controller = AnimationController(
duration: const Duration(seconds: 2),
vsync: this,
);
_animation = CurvedAnimation(
parent: _controller,
curve: Curves.easeInOut,
);
_controller.forward();
}


void dispose() {
_controller.dispose();
super.dispose();
}


Widget build(BuildContext context) {
return FadeTransition(
opacity: _animation,
child: const Text('Fade In Animation'),
);
}
}

4.2. Testing trong Flutter

Flutter hỗ trợ nhiều loại test:

  • Unit tests: Kiểm tra logic không phụ thuộc vào UI
  • Widget tests: Kiểm tra UI và tương tác
  • Integration tests: Kiểm tra toàn bộ ứng dụng
// Unit test
void main() {
test('Counter value should be incremented', () {
final counter = Counter();
counter.increment();
expect(counter.value, 1);
});
}

// Widget test
void main() {
testWidgets('Counter increments smoke test', (WidgetTester tester) async {
await tester.pumpWidget(MyApp());
expect(find.text('0'), findsOneWidget);
await tester.tap(find.byIcon(Icons.add));
await tester.pump();
expect(find.text('1'), findsOneWidget);
});
}

4.3. CI/CD cho Flutter

Tích hợp liên tục và triển khai liên tục (CI/CD) giúp tự động hóa quy trình phát triển.

  • Flutter CI/CD với GitHub Actions
  • Fastlane cho iOS và Android
  • Codemagic hoặc Bitrise cho Flutter

Giai đoạn 5: Tối ưu hóa và phát hành

5.1. Performance Optimization

Tối ưu hóa hiệu suất là quan trọng để ứng dụng chạy mượt mà.

  • Sử dụng const constructor khi có thể
  • Tránh rebuild không cần thiết
  • Sử dụng Flutter DevTools để phân tích hiệu suất
// Tránh rebuild không cần thiết với const
const MyWidget(
key: Key('my_widget'),
child: Text('Hello'),
);

// Tối ưu với ListView.builder cho danh sách dài
ListView.builder(
itemCount: items.length,
itemBuilder: (context, index) {
return ListTile(
title: Text(items[index].title),
);
},
);

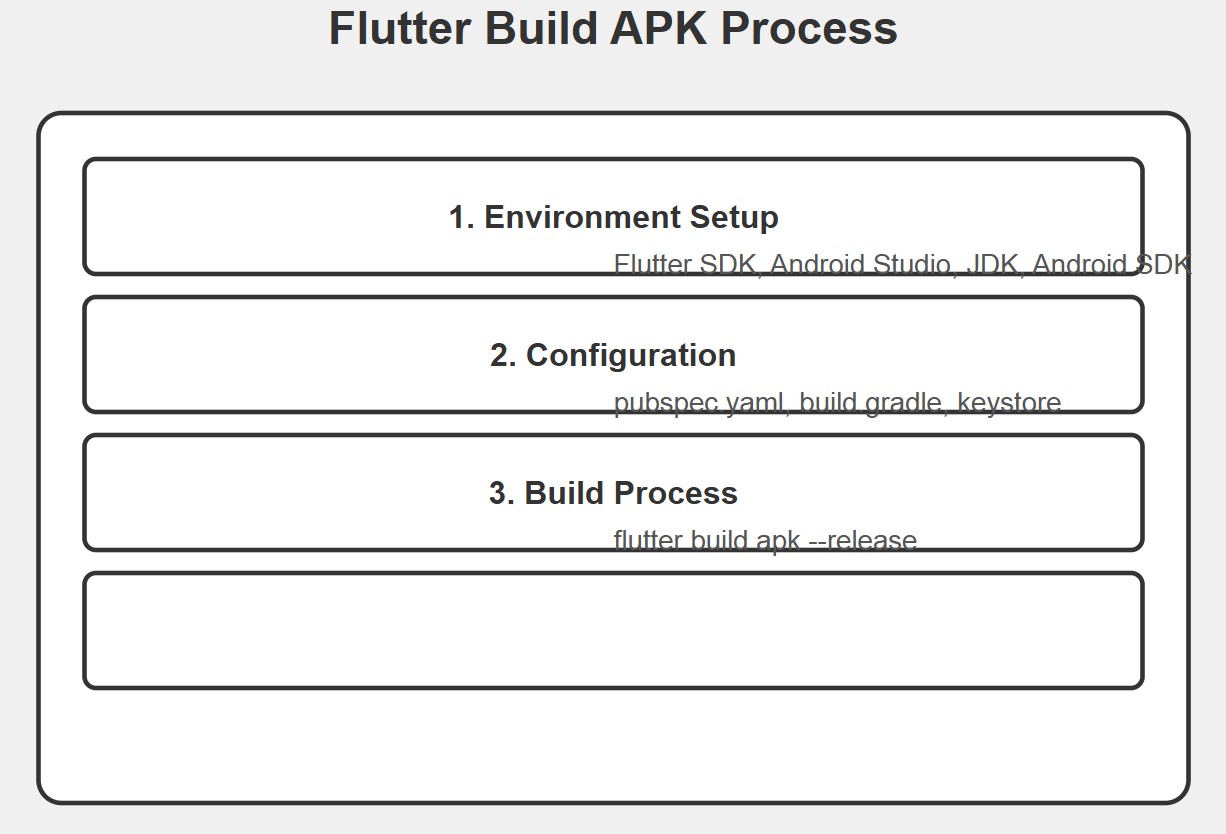
5.2. Phát hành ứng dụng

Phát hành ứng dụng lên App Store và Google Play Store.

App Store (iOS):

  1. Đăng ký Apple Developer Account
  2. Tạo App ID, Certificates, và Provisioning Profiles
  3. Đóng gói ứng dụng: flutter build ipa
  4. Sử dụng Xcode để tải lên App Store Connect

Google Play Store (Android):

  1. Đăng ký Google Play Developer Account
  2. Tạo keystore cho ứng dụng
  3. Đóng gói ứng dụng: flutter build appbundle
  4. Tải lên Google Play Console

Ứng dụng đầu tiên: Todo List App

Để áp dụng kiến thức đã học, hãy cùng xây dựng một ứng dụng Todo List đơn giản.

Bước 1: Tạo dự án mới

flutter create todo_app
cd todo_app

Bước 2: Định nghĩa model

// lib/models/todo.dart
class Todo {
final String id;
final String title;
bool isCompleted;

Todo({
required this.id,
required this.title,
this.isCompleted = false,
});
}

Bước 3: Tạo màn hình chính

// lib/screens/home_screen.dart
import 'package:flutter/material.dart';
import 'package:todo_app/models/todo.dart';

class HomeScreen extends StatefulWidget {

_HomeScreenState createState() => _HomeScreenState();
}

class _HomeScreenState extends State<HomeScreen> {
final List<Todo> _todos = [];
final _textController = TextEditingController();

void _addTodo() {
if (_textController.text.isEmpty) return;

setState(() {
_todos.add(Todo(
id: DateTime.now().toString(),
title: _textController.text,
));
_textController.clear();
});
}

void _toggleTodo(String id) {
setState(() {
final todo = _todos.firstWhere((todo) => todo.id == id);
todo.isCompleted = !todo.isCompleted;
});
}

void _removeTodo(String id) {
setState(() {
_todos.removeWhere((todo) => todo.id == id);
});
}


Widget build(BuildContext context) {
return Scaffold(
appBar: AppBar(
title: Text('Todo App'),
),
body: Column(
children: [
Padding(
padding: const EdgeInsets.all(16.0),
child: Row(
children: [
Expanded(
child: TextField(
controller: _textController,
decoration: InputDecoration(
hintText: 'Thêm công việc mới...',
),
),
),
IconButton(
icon: Icon(Icons.add),
onPressed: _addTodo,
),
],
),
),
Expanded(
child: _todos.isEmpty
? Center(child: Text('Chưa có công việc nào!'))
: ListView.builder(
itemCount: _todos.length,
itemBuilder: (context, index) {
final todo = _todos[index];
return ListTile(
title: Text(
todo.title,
style: TextStyle(
decoration: todo.isCompleted
? TextDecoration.lineThrough
: null,
),
),
leading: Checkbox(
value: todo.isCompleted,
onChanged: (_) => _toggleTodo(todo.id),
),
trailing: IconButton(
icon: Icon(Icons.delete),
onPressed: () => _removeTodo(todo.id),
),
);
},
),
),
],
),
);
}
}

Bước 4: Cập nhật main.dart

// lib/main.dart
import 'package:flutter/material.dart';
import 'package:todo_app/screens/home_screen.dart';

void main() {
runApp(TodoApp());
}

class TodoApp extends StatelessWidget {

Widget build(BuildContext context) {
return MaterialApp(
title: 'Todo App',
theme: ThemeData(
primarySwatch: Colors.blue,
),
home: HomeScreen(),
);
}
}

Bước 5: Chạy ứng dụng

flutter run

Các tài nguyên học Flutter

Hướng dẫn học Flutter

Tài liệu chính thức

Khóa học trực tuyến

Cộng đồng và Diễn đàn

Packages và Libraries

  • Pub.dev - Kho lưu trữ packages và plugins Flutter

Lời kết

Học Flutter có thể là một hành trình thú vị và bổ ích. Bằng cách theo dõi lộ trình này, bạn sẽ dần xây dựng được nền tảng vững chắc và phát triển các ứng dụng di động chất lượng cao. Hãy nhớ rằng, thực hành là chìa khóa để thành thạo Flutter - đừng ngại thử nghiệm và xây dựng các dự án thực tế.

Chúc bạn thành công trên con đường trở thành Flutter Developer!

Các ứng dụng thành công được xây dựng bằng Flutter

· 6 min read
admin

Các ứng dụng thành công được xây dựng bằng Flutter

Giới thiệu

Kể từ khi Google giới thiệu Flutter vào năm 2017, framework này đã nhanh chóng trở thành một trong những công cụ phát triển ứng dụng di động phổ biến nhất. Nhiều công ty lớn và nhỏ đã chọn Flutter để xây dựng ứng dụng của họ, dẫn đến nhiều trường hợp thành công ấn tượng trên thị trường.

Bài viết này sẽ điểm qua một số ứng dụng tiêu biểu được xây dựng bằng Flutter, chứng minh khả năng của framework này trong việc tạo ra các ứng dụng hiệu suất cao, giao diện đẹp và trải nghiệm người dùng tuyệt vời.

Các ứng dụng Google phát triển bằng Flutter

1. Google Ads

Google Ads là một trong những ứng dụng quan trọng đầu tiên của Google được phát triển bằng Flutter. Ứng dụng này cho phép doanh nghiệp quản lý chiến dịch quảng cáo của họ từ thiết bị di động.

Thành tựu:

  • Cải thiện 33% hiệu suất so với phiên bản trước
  • Giảm 50% thời gian phát triển tính năng mới
  • Trải nghiệm người dùng nhất quán trên cả iOS và Android

2. Google Pay (GPay)

Phiên bản mới của Google Pay (tại Ấn Độ và các thị trường khác) được xây dựng bằng Flutter, với trọng tâm là hiệu suất và khả năng mở rộng.

Thành tựu:

  • Phục vụ hơn 100 triệu người dùng tích cực hàng tháng
  • Xử lý hàng triệu giao dịch mỗi ngày
  • Thời gian khởi động giảm 1.7 giây
  • Kích thước ứng dụng giảm 35%

3. Google Classroom

Google Classroom, một nền tảng học tập trực tuyến, đã tích hợp các thành phần Flutter để cải thiện trải nghiệm người dùng của mình.

Thành tựu:

  • Tăng sự tương tác của người dùng 30%
  • Giảm 70% các báo cáo lỗi
  • Tăng tốc độ phát triển tính năng mới

Ứng dụng thương mại điện tử phát triển bằng Flutter

1. Alibaba

Alibaba, tập đoàn thương mại điện tử lớn nhất Trung Quốc, đã áp dụng Flutter cho một phần quan trọng trong ứng dụng xianyu (闲鱼) - nền tảng mua bán hàng đã qua sử dụng.

Thành tựu:

  • Phục vụ hơn 50 triệu người dùng
  • Giảm 50% thời gian phát triển
  • Trải nghiệm mượt mà với 60fps
  • Chia sẻ 95% mã nguồn giữa iOS và Android

2. eBay Motors

eBay đã sử dụng Flutter để xây dựng ứng dụng eBay Motors, cho phép người dùng mua và bán xe hơi.

Thành tựu:

  • Phát triển từ đầu trong chỉ 4 tháng
  • 100% tỷ lệ chia sẻ mã nguồn giữa nền tảng
  • Tăng 30% trong số lượng người dùng tham gia

Ứng dụng tài chính phát triển bằng Flutter

1. Nubank

Nubank, ngân hàng kỹ thuật số lớn nhất thế giới ngoài châu Á, đã chọn Flutter để xây dựng ứng dụng ngân hàng di động của họ.

Thành tựu:

  • Phục vụ hơn 45 triệu khách hàng
  • Cùng một đội ngũ phát triển cho cả hai nền tảng
  • Giảm 80% thời gian phát triển tính năng mới
  • Số lượng lỗi được báo cáo giảm đáng kể

2. Monzo Banking

Monzo, ngân hàng kỹ thuật số ở Vương quốc Anh, đã chuyển một phần quan trọng của ứng dụng sang Flutter.

Thành tựu:

  • 500.000 dòng mã Dart
  • 1.5 triệu người dùng tích cực
  • Giảm 50% chi phí phát triển

Ứng dụng mạng xã hội và truyền thông phát triển bằng Flutter

1. Tencent (WeChat & QQ)

Tencent, công ty công nghệ hàng đầu Trung Quốc, đã áp dụng Flutter trong các ứng dụng phổ biến nhất của họ như WeChat và QQ.

Thành tựu:

  • Phục vụ hàng trăm triệu người dùng
  • Giảm đáng kể thời gian phát triển
  • Mang lại trải nghiệm nhất quán trên nhiều nền tảng

2. ByteDance

ByteDance, công ty đứng sau TikTok, đã sử dụng Flutter trong nhiều ứng dụng của họ, bao gồm Feiyu (Ứng dụng liên quan đến TikTok).

Thành tựu:

  • Tăng tốc độ phát triển 30%
  • Giảm 40% tài nguyên phát triển
  • Chia sẻ mã nguồn giữa nhiều nền tảng

Ứng dụng giao thông vận tải phát triển bằng Flutter

1. Grab

Grab, nền tảng đặt xe và giao hàng phổ biến ở Đông Nam Á, đã sử dụng Flutter cho một số tính năng trong ứng dụng của họ.

Thành tựu:

  • Cải thiện hiệu suất 30%
  • Giảm thời gian phát triển 40%
  • Trải nghiệm người dùng nhất quán trên nhiều thiết bị

2. BMW

BMW đã sử dụng Flutter để phát triển ứng dụng My BMW, cho phép chủ sở hữu xe BMW điều khiển các chức năng của xe từ xa.

Thành tựu:

  • Phát triển cùng lúc cho iOS và Android
  • Giảm 30% chi phí bảo trì
  • Tăng 40% tốc độ phát hành tính năng

Ví dụ mã nguồn Flutter từ các ứng dụng thành công

// Ví dụ về cách xây dựng giao diện người dùng kiểu Alibaba
class ProductCard extends StatelessWidget {
final String imageUrl;
final String title;
final double price;
final double rating;

const ProductCard({
Key? key,
required this.imageUrl,
required this.title,
required this.price,
required this.rating,
}) : super(key: key);


Widget build(BuildContext context) {
return Container(
decoration: BoxDecoration(
color: Colors.white,
borderRadius: BorderRadius.circular(8),
boxShadow: [
BoxShadow(
color: Colors.black12,
blurRadius: 4,
offset: Offset(0, 2),
),
],
),
margin: EdgeInsets.all(8),
child: Column(
crossAxisAlignment: CrossAxisAlignment.start,
children: [
ClipRRect(
borderRadius: BorderRadius.vertical(top: Radius.circular(8)),
child: Image.network(
imageUrl,
height: 120,
width: double.infinity,
fit: BoxFit.cover,
),
),
Padding(
padding: EdgeInsets.all(8),
child: Column(
crossAxisAlignment: CrossAxisAlignment.start,
children: [
Text(
title,
style: TextStyle(
fontWeight: FontWeight.bold,
fontSize: 16,
),
maxLines: 2,
overflow: TextOverflow.ellipsis,
),
SizedBox(height: 4),
Text(
${price.toStringAsFixed(2)}',
style: TextStyle(
color: Colors.red,
fontWeight: FontWeight.bold,
fontSize: 18,
),
),
SizedBox(height: 4),
Row(
children: [
Icon(Icons.star, color: Colors.amber, size: 16),
SizedBox(width: 4),
Text(
rating.toString(),
style: TextStyle(color: Colors.grey),
),
],
),
],
),
),
],
),
);
}
}