Giới thiệu
Bot đầu tư tài chính, hay còn gọi là robot giao dịch, là các phần mềm sử dụng thuật toán và công nghệ trí tuệ nhân tạo để thực hiện các quyết định đầu tư tự động. Trong những năm gần đây, các bot đầu tư đã trở nên phổ biến do sự phát triển của công nghệ, chi phí giao dịch thấp hơn và khả năng tiếp cận thông tin thị trường dễ dàng hơn. Tuy nhiên, câu hỏi quan trọng mà nhiều nhà đầu tư đặt ra là: bot đầu tư tài chính có thực sự hiệu quả không?
Bài viết này sẽ phân tích toàn diện về hiệu quả của bot đầu tư tài chính, ưu và nhược điểm, các loại bot phổ biến, và những điều cần cân nhắc khi sử dụng chúng.
Mục lục
- Các loại bot đầu tư tài chính
- Hiệu quả của bot đầu tư: Nghiên cứu và số liệu
- Lợi ích của việc sử dụng bot đầu tư
- Hạn chế và rủi ro
- So sánh hiệu suất: Bot vs. Con người
- Các yếu tố ảnh hưởng đến hiệu quả của bot
- Cách chọn và sử dụng bot đầu tư hiệu quả
- Nghiên cứu tình huống thực tế
- Tương lai của công nghệ bot đầu tư
- Kết luận
Các loại bot đầu tư tài chính
Bot đầu tư tài chính có nhiều loại khác nhau, mỗi loại được thiết kế cho mục đích và chiến lược đầu tư cụ thể:
1. Bot giao dịch theo xu hướng (Trend Following Bots)
Đây là loại bot phổ biến nhất, hoạt động dựa trên nguyên tắc "xu hướng là bạn của bạn". Chúng sử dụng các chỉ báo kỹ thuật như đường trung bình động (MA) để xác định xu hướng thị trường và đưa ra quyết định mua hoặc bán.
Cách hoạt động: Bot sẽ mua khi giá vượt lên trên đường trung bình động và bán khi giá giảm xuống dưới đường trung bình động.
Hiệu quả: Bot theo xu hướng thường hoạt động tốt trong các thị trường có xu hướng mạnh, nhưng kém hiệu quả trong thị trường đi ngang (sideway markets).
2. Bot giao dịch dao động (Oscillator Bots)
Loại bot này sử dụng các chỉ báo dao động như RSI (Relative Strength Index), Stochastic, hoặc MACD để xác định khi nào thị trường quá mua hoặc quá bán.
Cách hoạt động: Bot sẽ bán khi chỉ báo cho thấy thị trường quá mua và mua khi chỉ báo cho thấy thị trường quá bán.
Hiệu quả: Hoạt động tốt trong thị trường đi ngang nhưng có thể cho tín hiệu sai trong thị trường có xu hướng mạnh.
3. Bot giao dịch chênh lệch giá (Arbitrage Bots)
Các bot này tìm kiếm và tận dụng sự chênh lệch giá của cùng một tài sản trên các thị trường khác nhau.
Cách hoạt động: Bot sẽ mua tài sản ở nơi có giá thấp hơn và đồng thời bán ở nơi có giá cao hơn, thu lợi nhuận từ chênh lệch.
Hiệu quả: Hiệu quả cao trong thị trường kém hiệu quả (inefficient markets), nhưng cơ hội ngày càng ít đi do sự cạnh tranh và các thị trường ngày càng hiệu quả hơn.
4. Robo-advisors
Đây là các nền tảng đầu tư tự động giúp quản lý danh mục đầu tư dựa trên mục tiêu, khả năng chịu rủi ro và thời gian đầu tư của người dùng.
Cách hoạt động: Dựa trên thông tin cá nhân và mục tiêu tài chính, robo-advisor sẽ tạo và quản lý danh mục đầu tư đa dạng hóa, tự động tái cân bằng khi cần.
Hiệu quả: Hiệu quả cho đầu tư dài hạn, chi phí thấp, và khả năng tiếp cận cao cho nhà đầu tư nhỏ lẻ.
5. Bot giao dịch theo tin tức (News-based Trading Bots)
Loại bot này phân tích tin tức và dữ liệu ngữ cảnh để đưa ra quyết định giao dịch.
Cách hoạt động: Sử dụng xử lý ngôn ngữ tự nhiên (NLP) để phân tích tin tức và đưa ra quyết định dựa trên tình cảm (sentiment) thị trường.
Hiệu quả: Có thể hiệu quả khi phản ứng với các sự kiện tin tức lớn, nhưng đối mặt với thách thức trong việc diễn giải chính xác ý nghĩa của tin tức.
6. Bot giao dịch dựa trên máy học (Machine Learning Trading Bots)
Sử dụng các thuật toán học máy để dự đoán biến động giá và đưa ra quyết định giao dịch.
Cách hoạt động: Phân tích lượng lớn dữ liệu lịch sử để tìm mẫu hình và mối tương quan, sau đó áp dụng mô hình được huấn luyện để dự đoán biến động giá trong tương lai.
Hiệu quả: Có tiềm năng cao nhưng cũng phức tạp và đòi hỏi kiến thức chuyên sâu về AI và thị trường tài chính.
Hiệu quả của bot đầu tư: Nghiên cứu và số liệu
Hiệu quả của bot đầu tư tài chính là một chủ đề được nghiên cứu rộng rãi, với kết quả hỗn hợp tùy thuộc vào nhiều yếu tố:
Nghiên cứu học thuật
Một số nghiên cứu đáng chú ý:
-
Nghiên cứu của ĐH MIT (2019): Phân tích hiệu suất của các thuật toán giao dịch tự động cho thấy các bot có thể vượt trội so với nhà đầu tư cá nhân trong môi trường thị trường biến động cao, nhưng thường kém hiệu quả hơn trong thời kỳ khủng hoảng hoặc biến động thị trường đột ngột.
-
Journal of Finance (2021): Nghiên cứu về robo-advisors cho thấy danh mục đầu tư quản lý bởi bot thường có hiệu suất tương đương hoặc tốt hơn một chút so với các nhà quản lý quỹ truyền thống, đồng thời với chi phí thấp hơn đáng kể.
-
Báo cáo của Morningstar (2022): Phân tích dữ liệu từ hơn 200 robo-advisor cho thấy hiệu suất trung bình dao động từ 4-8% mỗi năm trong giai đoạn 2017-2021, với mức phí trung bình khoảng 0.25-0.50% (so với 1-2% của các nhà quản lý truyền thống).
Số liệu từ ngành công nghiệp
Hiệu suất của một số nền tảng bot đầu tư hàng đầu:
| Nền tảng | Hiệu suất trung bình hàng năm (5 năm) | Phí quản lý | Đầu tư tối thiểu |
|---|
| Betterment | 7.3% | 0.25% | $0 |
| Wealthfront | 6.9% | 0.25% | $500 |
| SoFi Automated Investing | 6.1% | 0.0% | $1 |
| Schwab Intelligent Portfolios | 5.8% | 0.0% | $5,000 |
| Vanguard Digital Advisor | 6.5% | 0.20% | $3,000 |
Lưu ý: Hiệu suất trong quá khứ không đảm bảo kết quả trong tương lai.
Phân tích hiệu quả theo loại bot
Theo một nghiên cứu năm 2023 của QuantConnect, hiệu quả trung bình của các loại bot giao dịch khác nhau:
- Bot giao dịch theo xu hướng: Hiệu suất trung bình +5.2%/năm, tỷ lệ Sharpe 0.78
- Bot giao dịch dao động: Hiệu suất trung bình +3.8%/năm, tỷ lệ Sharpe 0.62
- Bot arbitrage: Hiệu suất trung bình +2.7%/năm, tỷ lệ Sharpe 1.2 (rủi ro thấp)
- Bot dựa trên học máy: Hiệu suất trung bình +8.1%/năm, tỷ lệ Sharpe 0.85
Lợi ích của việc sử dụng bot đầu tư
Các bot đầu tư tài chính cung cấp nhiều lợi ích đáng kể cho nhà đầu tư:
1. Loại bỏ cảm xúc
Con người thường bị ảnh hưởng bởi cảm xúc khi đầu tư, dẫn đến các quyết định bất hợp lý như "mua khi thị trường tăng" và "bán khi thị trường giảm". Bot đầu tư hoạt động dựa trên logic và thuật toán, không bị ảnh hưởng bởi sợ hãi, tham lam, hay hy vọng.
2. Tốc độ và hiệu quả
Bot có thể phân tích lượng lớn dữ liệu và thực hiện giao dịch trong tích tắc, nhanh hơn nhiều so với con người. Điều này đặc biệt quan trọng trong thị trường biến động nhanh.
3. Giao dịch 24/7
Khác với con người, bot có thể hoạt động liên tục, theo dõi thị trường và thực hiện giao dịch bất kỳ lúc nào, kể cả đêm khuya hay cuối tuần (đối với các thị trường như tiền điện tử).
4. Đa dạng hóa hiệu quả
Bot có thể dễ dàng quản lý và theo dõi nhiều tài sản cùng lúc, giúp đa dạng hóa danh mục đầu tư hiệu quả hơn.
5. Chi phí thấp
Robo-advisors thường có phí quản lý thấp hơn nhiều so với các nhà quản lý tài sản truyền thống, giúp tiết kiệm chi phí đáng kể theo thời gian.
6. Kỷ luật và nhất quán
Bot sẽ tuân theo chiến lược đã được lập trình một cách nhất quán, không bị chi phối bởi các yếu tố bên ngoài.
7. Khả năng tiếp cận cao
Nhiều nền tảng bot đầu tư có mức đầu tư tối thiểu thấp, giúp nhà đầu tư nhỏ lẻ có thể tiếp cận với các chiến lược đầu tư phức tạp.
Hạn chế và rủi ro
Mặc dù có nhiều lợi ích, bot đầu tư tài chính cũng có những hạn chế và rủi ro đáng kể:
1. Rủi ro kỹ thuật
Bot có thể gặp lỗi kỹ thuật, lỗi lập trình, hoặc sự cố hệ thống, dẫn đến các quyết định giao dịch sai lầm hoặc thất bại trong việc thực hiện giao dịch.
2. Thiếu sự thích ứng với thay đổi đột ngột
Các thuật toán thường được huấn luyện trên dữ liệu lịch sử và có thể không thích ứng tốt với các sự kiện thị trường chưa từng xảy ra hoặc "thiên nga đen" (black swan events) - những sự kiện cực kỳ hiếm và khó dự đoán.
3. Quá độ tin cậy vào mô hình
Một hạn chế phổ biến được gọi là "overfitting" - khi mô hình quá phù hợp với dữ liệu lịch sử nhưng không thể tổng quát hóa tốt cho dữ liệu mới.
4. Thiếu hiểu biết sâu sắc về ngữ cảnh
Bot không thể hiểu đầy đủ các yếu tố phức tạp như điều kiện kinh tế-chính trị, tâm lý thị trường, hoặc các sự kiện toàn cầu ảnh hưởng đến thị trường.
5. Rủi ro đồng bộ (Systemic Risk)
Khi nhiều bot đầu tư sử dụng các thuật toán tương tự, chúng có thể phản ứng giống nhau đối với các sự kiện thị trường, tiềm ẩn nguy cơ tạo ra biến động thị trường cực đoan ("flash crashes").
6. Chi phí ẩn
Ngoài phí quản lý, có thể có các chi phí ẩn như phí giao dịch, phí nền tảng, hoặc chi phí thuế do tần suất giao dịch cao.
7. Hạn chế pháp lý và quy định
Quy định về bot giao dịch khác nhau giữa các quốc gia và có thể thay đổi, gây ra rủi ro về mặt tuân thủ.
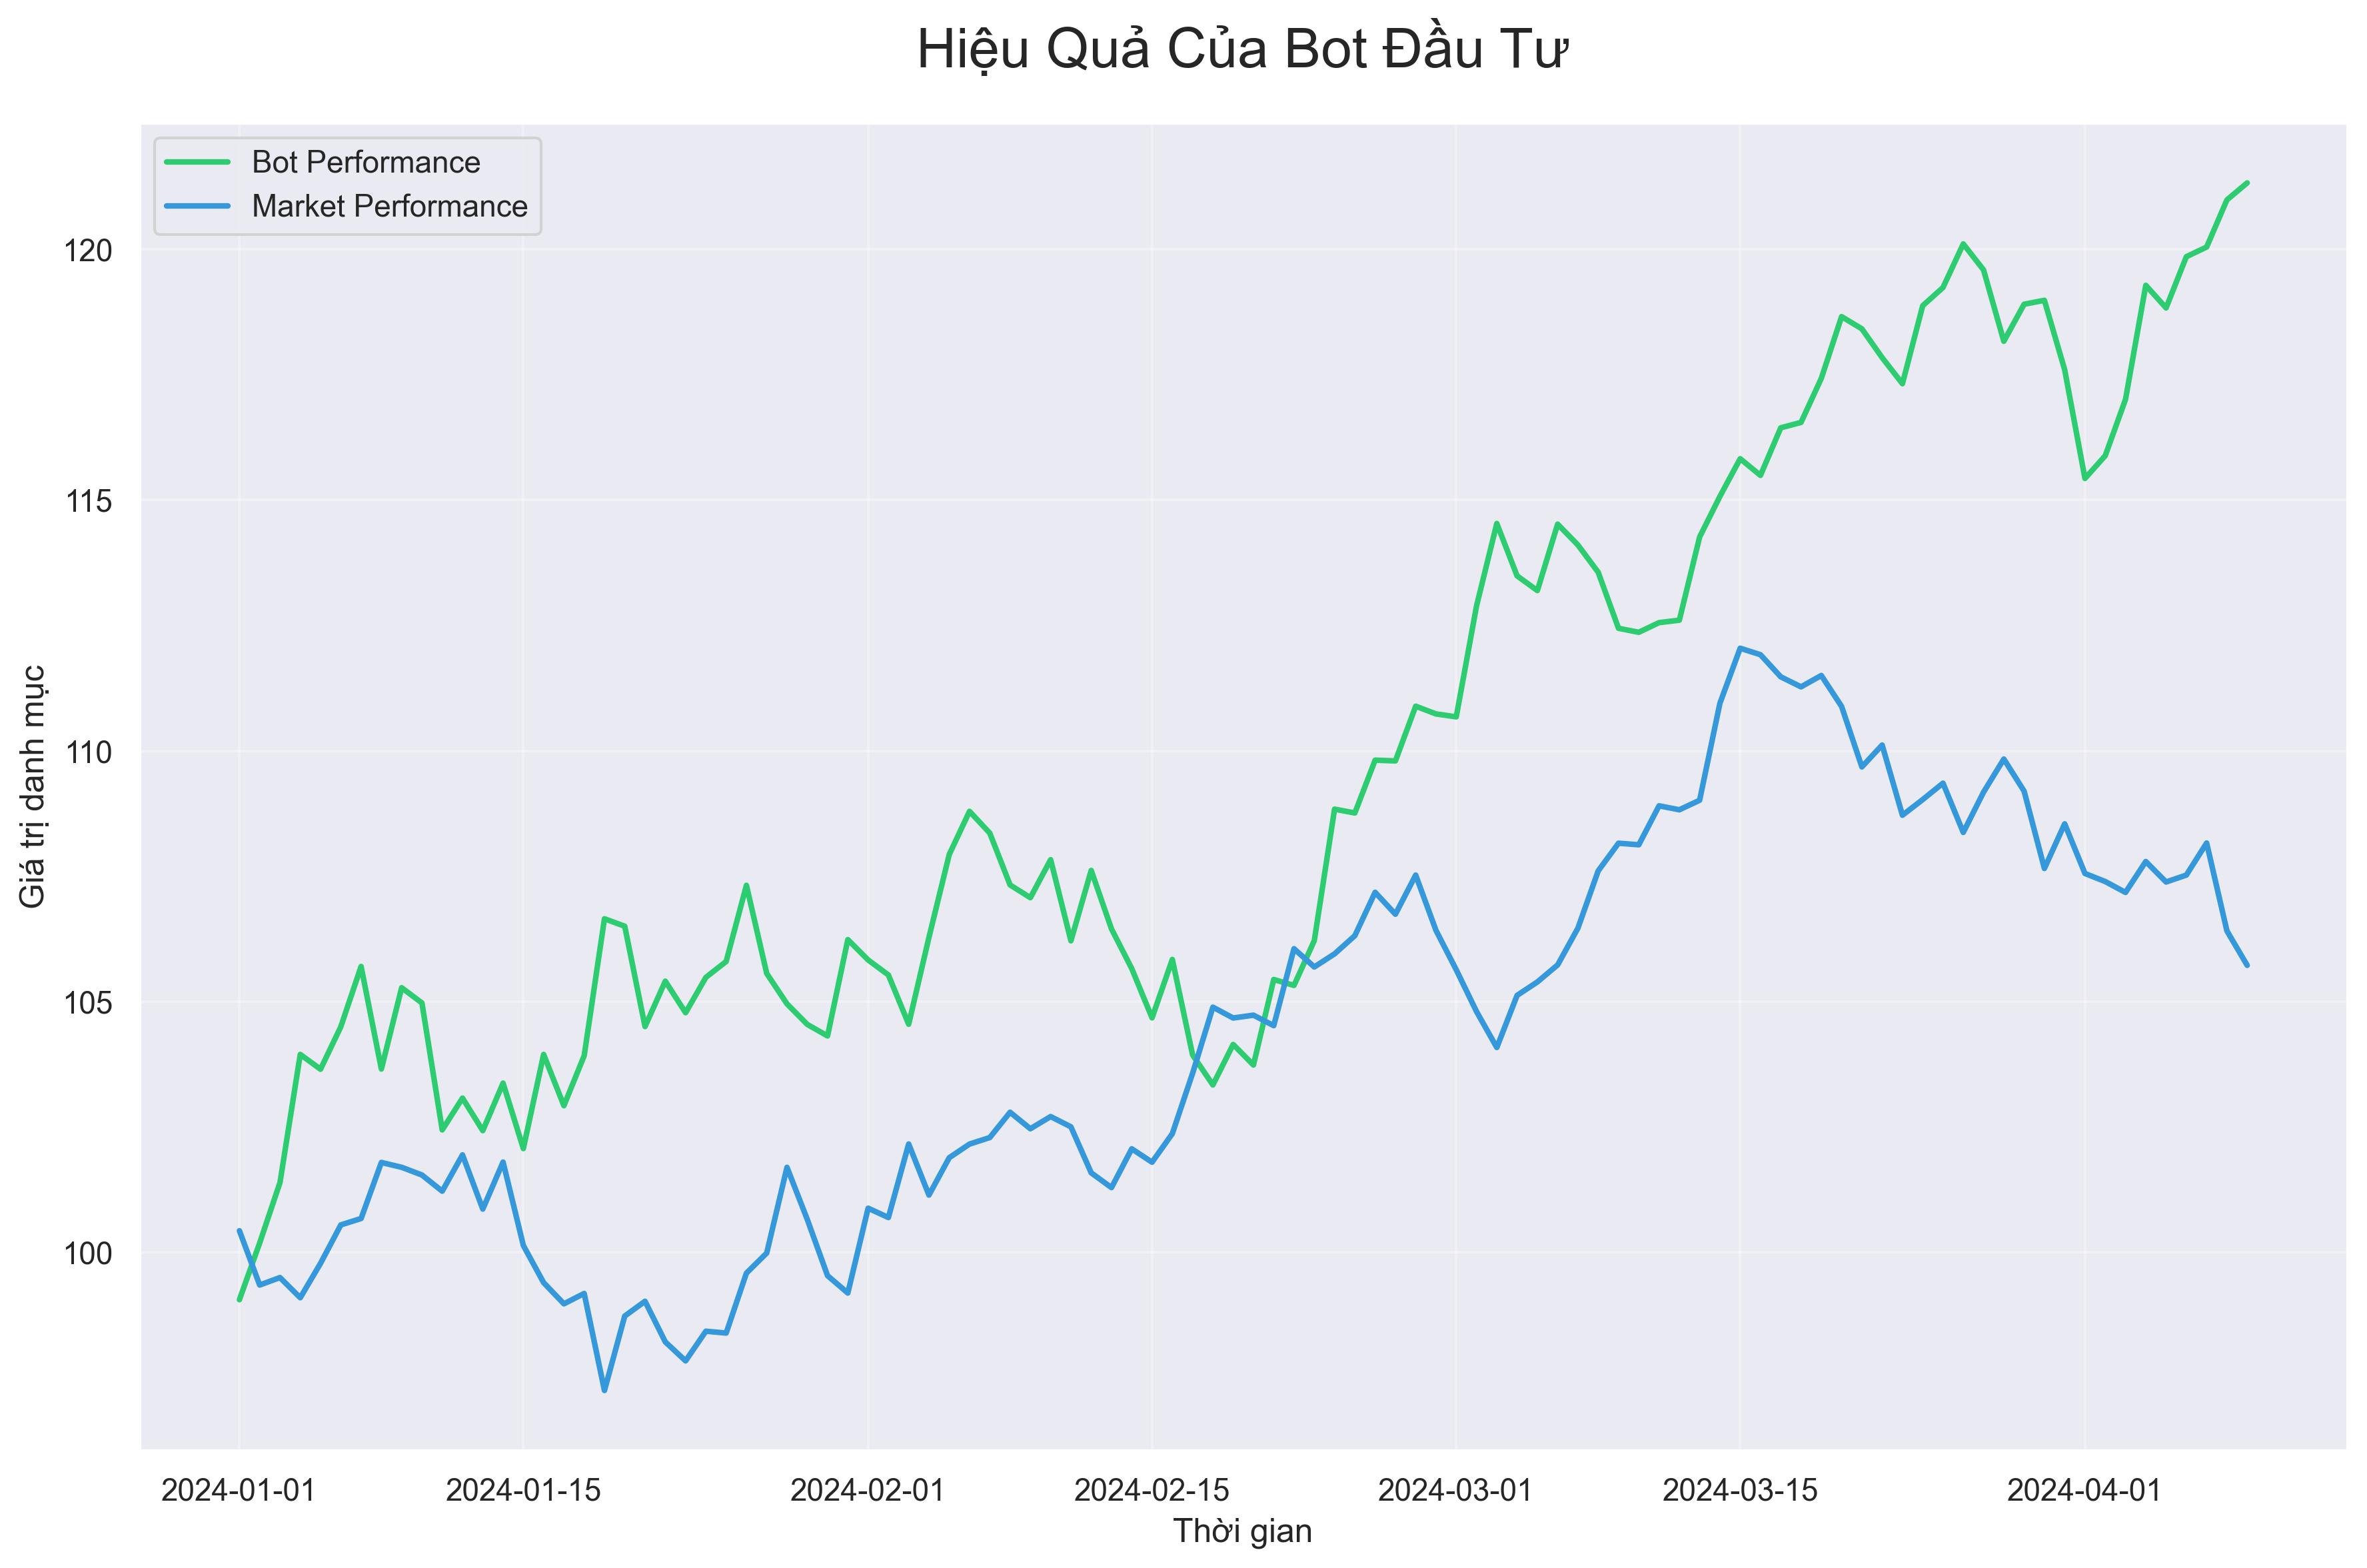
So sánh hiệu suất: Bot vs. Con người
Việc so sánh hiệu suất giữa bot đầu tư và con người là một chủ đề phức tạp và có nhiều khía cạnh:
Hiệu suất dài hạn
- Bot: Nghiên cứu từ Vanguard cho thấy robo-advisors và các chiến lược đầu tư thụ động có xu hướng vượt trội so với 80% nhà quản lý quỹ chủ động trong khoảng thời gian 10 năm.
- Con người: Một số nhà quản lý tài sản hàng đầu như Warren Buffett, Ray Dalio đã liên tục đánh bại thị trường trong nhiều thập kỷ nhờ vào sự hiểu biết sâu sắc, kinh nghiệm và phân tích cơ bản.
Khả năng thích ứng
- Bot: Hiệu quả cao trong điều kiện thị trường ổn định và có thể dự đoán, nhưng thường gặp khó khăn trong các cuộc khủng hoảng hoặc thay đổi cơ bản của thị trường.
- Con người: Có khả năng thích ứng tốt hơn với các sự kiện bất thường và có thể điều chỉnh chiến lược dựa trên thông tin định tính và trực giác.
Chi phí và hiệu quả
- Bot: Chi phí thấp hơn nhiều (0-0.5% so với 1-2% phí quản lý của con người), tác động tích cực đến lợi nhuận ròng trong dài hạn.
- Con người: Chi phí cao hơn, nhưng có thể cung cấp giá trị bổ sung thông qua tư vấn tài chính toàn diện và lập kế hoạch thuế.
Ảnh hưởng của quy mô
- Bot: Hiệu quả tương đối ổn định ở các quy mô danh mục khác nhau.
- Con người: Hiệu suất thường giảm khi quy mô quỹ tăng, do giảm tính linh hoạt và tăng tác động thị trường.
Dữ liệu so sánh hiệu suất
Theo báo cáo của Morningstar năm 2023:
| Loại nhà đầu tư | Hiệu suất trung bình 5 năm | Tỷ lệ Sharpe | Chi phí trung bình |
|---|
| Robo-advisors | 6.5% | 0.82 | 0.25% |
| Quỹ tương hỗ chủ động | 5.8% | 0.75 | 1.5% |
| Nhà đầu tư cá nhân tự quản lý | 4.3% | 0.62 | Biến động |
| ETF theo chỉ số | 7.2% | 0.88 | 0.1% |
Lưu ý: Hiệu suất có thể thay đổi tùy thuộc vào điều kiện thị trường và chiến lược cụ thể.
Các yếu tố ảnh hưởng đến hiệu quả của bot
Hiệu quả của bot đầu tư tài chính phụ thuộc vào nhiều yếu tố:
1. Chất lượng thuật toán
Thuật toán là trái tim của bot đầu tư. Một thuật toán được thiết kế tốt, dựa trên các nguyên tắc tài chính vững chắc, sẽ có hiệu suất tốt hơn nhiều so với thuật toán đơn giản hoặc thiếu cơ sở lý thuyết.
2. Chất lượng và độ bao phủ của dữ liệu
Dữ liệu là nguyên liệu đầu vào quan trọng. Bot cần dữ liệu chính xác, đầy đủ và kịp thời để đưa ra quyết định tốt.
3. Tối ưu hóa tham số
Cách các tham số của thuật toán được thiết lập và tối ưu hóa có ảnh hưởng lớn đến hiệu suất. Quá trình này cần cân bằng giữa việc phù hợp với dữ liệu lịch sử và khả năng tổng quát hóa.
4. Cơ sở hạ tầng kỹ thuật
Tốc độ xử lý, độ trễ kết nối, và độ tin cậy của hệ thống ảnh hưởng đáng kể đến khả năng thực hiện giao dịch kịp thời.
5. Chi phí giao dịch
Phí giao dịch cao có thể làm giảm đáng kể lợi nhuận, đặc biệt đối với các bot giao dịch với tần suất cao.
6. Điều kiện thị trường
Một số bot hoạt động tốt trong thị trường đi lên, trong khi những bot khác có thể hiệu quả hơn trong thị trường đi xuống hoặc đi ngang.
7. Quy định và hạn chế
Các quy định về giao dịch, thuế, và yêu cầu báo cáo có thể ảnh hưởng đến hiệu quả của bot.
8. Mức độ tùy chỉnh
Bot có khả năng tùy chỉnh theo nhu cầu và khẩu vị rủi ro cụ thể của nhà đầu tư thường mang lại kết quả tốt hơn so với giải pháp "một kích cỡ phù hợp cho tất cả".
9. Chiến lược giao dịch áp dụng
Không phải tất cả các chiến lược giao dịch đều có hiệu quả như nhau trong mọi điều kiện thị trường hoặc với mọi loại tài sản.
Cách chọn và sử dụng bot đầu tư hiệu quả
Để tối đa hóa hiệu quả của bot đầu tư, nhà đầu tư nên cân nhắc các hướng dẫn sau:
1. Xác định mục tiêu đầu tư rõ ràng
Trước khi chọn bot, hãy xác định rõ mục tiêu tài chính, khung thời gian đầu tư, và khả năng chịu rủi ro của bạn.
2. Nghiên cứu kỹ lưỡng
Tìm hiểu về công nghệ, thuật toán, và hiệu suất trong quá khứ của bot. Kiểm tra các đánh giá và so sánh với các giải pháp khác.
3. Hiểu rõ cách bot hoạt động
Không nên sử dụng bot như một "hộp đen". Hãy tìm hiểu về chiến lược, logic, và cách bot đưa ra quyết định.
4. Đánh giá chi phí toàn diện
Xem xét tất cả các chi phí liên quan đến việc sử dụng bot, bao gồm phí quản lý, phí giao dịch, và các chi phí ẩn khác.
5. Bắt đầu nhỏ và mở rộng dần
Thử nghiệm bot với một phần nhỏ danh mục đầu tư trước khi cam kết nhiều hơn.
6. Giám sát và đánh giá thường xuyên
Theo dõi hiệu suất của bot và so sánh với các tiêu chuẩn liên quan (benchmarks). Điều chỉnh nếu cần thiết.
7. Kết hợp với phân tích con người
Sử dụng bot như một công cụ hỗ trợ, kết hợp với đánh giá và phân tích cá nhân để có kết quả tốt nhất.
8. Đa dạng hóa chiến lược
Cân nhắc sử dụng nhiều bot với các chiến lược khác nhau để phân tán rủi ro.
9. Lựa chọn nền tảng uy tín
Chọn các nền tảng bot đầu tư từ các công ty uy tín, có lịch sử hoạt động tốt và bảo mật cao.
10. Cập nhật kiến thức liên tục
Theo dõi các xu hướng mới trong công nghệ tài chính và đầu tư tự động để luôn nắm bắt các cơ hội và rủi ro.
Nghiên cứu tình huống thực tế
Tình huống 1: Betterment - Robo-Advisor phổ biến
Betterment, một trong những robo-advisor hàng đầu, đã đạt được hiệu suất ấn tượng trong thập kỷ qua. Theo dữ liệu công khai, danh mục 70% cổ phiếu/30% trái phiếu của Betterment đã mang lại lợi nhuận trung bình 8.8% hàng năm từ 2012-2022, so với 8.1% của chỉ số tương đương.
Bài học: Chiến lược đầu tư đơn giản, đa dạng hóa và chi phí thấp có thể mang lại hiệu quả vượt trội trong dài hạn.
Tình huống 2: Thất bại của Knight Capital
Vào năm 2012, Knight Capital, một công ty giao dịch thuật toán lớn, đã mất 440 triệu USD trong vòng 45 phút do lỗi phần mềm trong thuật toán giao dịch của họ. Sự cố này gần như khiến công ty phá sản và buộc phải bán lại.
Bài học: Rủi ro kỹ thuật là có thật và có thể gây ra hậu quả nghiêm trọng, làm nổi bật tầm quan trọng của việc kiểm tra, giám sát và kiểm soát rủi ro.
Tình huống 3: Wealthfront và tối ưu hóa thuế
Wealthfront, một robo-advisor khác, đã giới thiệu tính năng "thu hoạch lỗ thuế" (tax-loss harvesting) tự động, giúp khách hàng tối ưu hóa thuế một cách hiệu quả. Theo báo cáo của công ty, tính năng này đã giúp tăng lợi nhuận hàng năm thêm 0.5-1.5% cho khách hàng.
Bài học: Bot đầu tư có thể tạo giá trị bổ sung thông qua các chiến lược mà con người khó thực hiện một cách nhất quán, như tối ưu hóa thuế liên tục.
Tình huống 4: Renaissance Technologies
Renaissance Technologies, một trong những quỹ đầu cơ thành công nhất mọi thời đại, sử dụng các mô hình định lượng và thuật toán phức tạp để giao dịch. Quỹ Medallion của họ đã mang lại lợi nhuận trung bình hàng năm khoảng 66% trong hơn 30 năm (trước phí).
Bài học: Thuật toán phức tạp, được hỗ trợ bởi nghiên cứu chuyên sâu và dữ liệu chất lượng cao, có thể mang lại hiệu suất phi thường, nhưng thường đòi hỏi nguồn lực và chuyên môn đáng kể.
Tương lai của công nghệ bot đầu tư
Công nghệ bot đầu tư đang phát triển nhanh chóng với nhiều xu hướng thú vị:
1. AI và học sâu (Deep Learning)
Các mô hình học sâu, đặc biệt là mạng nơ-ron tích chập (CNN) và mạng nơ-ron hồi quy (RNN), đang được áp dụng để phân tích dữ liệu thị trường phức tạp và tìm ra các mẫu mà con người có thể bỏ qua.
2. Xử lý ngôn ngữ tự nhiên nâng cao
Bot đầu tư trong tương lai sẽ có khả năng phân tích tốt hơn các nguồn dữ liệu phi cấu trúc như tin tức, báo cáo công ty, và mạng xã hội để đưa ra quyết định.
3. Tính cá nhân hóa cao hơn
Chúng ta sẽ thấy các bot được tùy chỉnh hơn nữa cho từng nhà đầu tư cụ thể, dựa trên dữ liệu về hành vi, mục tiêu, và tình hình tài chính của họ.
4. Công nghệ blockchain và hợp đồng thông minh
Blockchain và hợp đồng thông minh có thể mang lại tính minh bạch, bảo mật, và tự động hóa cao hơn cho các bot đầu tư.
5. Kết hợp giữa con người và AI
Xu hướng là kết hợp trí tuệ nhân tạo với phân tích của con người để tận dụng ưu điểm của cả hai phương pháp.
6. Quy định phù hợp hơn
Các quy định sẽ phát triển để giải quyết các rủi ro liên quan đến bot đầu tư, đặc biệt là rủi ro hệ thống và bảo vệ nhà đầu tư.
7. Dân chủ hóa đầu tư thuật toán
Các công cụ và nền tảng sẽ ngày càng dễ tiếp cận hơn, cho phép nhà đầu tư cá nhân phát triển và triển khai các chiến lược giao dịch thuật toán của riêng họ.
Kết luận
Câu hỏi "Bot đầu tư tài chính có hiệu quả không?" không có câu trả lời đơn giản. Dựa trên các nghiên cứu và dữ liệu hiện có, có thể kết luận rằng:
-
Bot đầu tư có thể hiệu quả trong nhiều tình huống, đặc biệt là với các chiến lược đầu tư dài hạn, đa dạng hóa và chi phí thấp như robo-advisors.
-
Hiệu quả phụ thuộc vào nhiều yếu tố bao gồm thiết kế thuật toán, điều kiện thị trường, chất lượng dữ liệu, và sự phù hợp với mục tiêu tài chính của nhà đầu tư.
-
Bot có ưu điểm riêng như khách quan, kỷ luật, và khả năng xử lý lượng lớn dữ liệu, nhưng cũng có những hạn chế như thiếu linh hoạt và hiểu biết về ngữ cảnh.
-
Cách tiếp cận kết hợp giữa tự động hóa và phán đoán con người thường mang lại kết quả tốt nhất, tận dụng ưu điểm của cả hai phương pháp.
-
Công nghệ đang phát triển nhanh chóng, với AI và học máy mở ra những khả năng mới cho bot đầu tư, nhưng cũng đi kèm với những thách thức và rủi ro mới.
Đối với nhà đầu tư cá nhân, bot đầu tư có thể là công cụ mạnh mẽ để cải thiện kết quả đầu tư, nhưng cần được sử dụng một cách thông minh, với sự hiểu biết rõ ràng về cách chúng hoạt động, lợi ích và giới hạn của chúng, và sự phù hợp với chiến lược tài chính tổng thể của bạn.
Trong tương lai, chúng ta có thể kỳ vọng các bot đầu tư sẽ trở nên thông minh hơn, cá nhân hóa hơn, và dễ tiếp cận hơn, mang đến nhiều cơ hội hơn cho nhà đầu tư ở mọi quy mô tận dụng sức mạnh của tự động hóa trong đầu tư.